
Full Body Workout Three Day Split
You want maximum gains? Then check out this beast of a workout. We have combined the most effective exercises in this three day split workout.
Three Day Split - Chest and Back
6 exercises
The dumbbell bench press is a versatile upper-body exercise primarily targeting the pectoral muscles (chest), triceps, and deltoids (shoulders). By using dumbbells, athletes benefit from an increased range of motion and enhanced stabilization compared to a traditional barbell bench press. This exercise promotes muscle symmetry, reduces muscular imbalances, and improves functional strength, which is crucial for athletic performance. Suitable for all fitness levels, it aids in hypertrophy, strength building, and overall upper-body conditioning, making it a valuable addition to any athlete's training regimen.
Community Averages
37kg
Avg. weight
82lbs
Avg. weight
* Based on data from the Blaze community
Description
- 1Hold a dumbbell in each hand, sit on a flat bench and rest one dumbbell on each knee.
- 2While you lie back on the bench, kick each dumbbell up into position resting on your chest, one at a time.
- 3Position the dumbbells to the sides of your chest. Tuck your elbows in to approximately a 45-degree angle.
- 4Place your feet firmly on the ground. Exhale as you press the dumbbells upward and inward until your arms are almost fully extended and the dumbbells nearly touch above the center of your face.
- 5Inhale as you slowly lower the dumbbells back to the starting position. For an extra pump, lower the dumbbells beyond the starting position until you feel a slight stretch in your chest.
- 6You have completed your first repetition. Repeat the motion in a controlled way and count your reps.
Tips & Tricks
- •Neutral Grip: Hold the dumbbells with a neutral grip, meaning your palms should face each other. This can reduce strain on your shoulders.
- •Firm Grip: Ensure your grip on the dumbbells is firm but not overly tight to remove unnecessary tension from your arms.
- •Back Arch: Maintain a natural arch in your lower back. Your buttocks, upper back, and head should remain firmly on the bench.
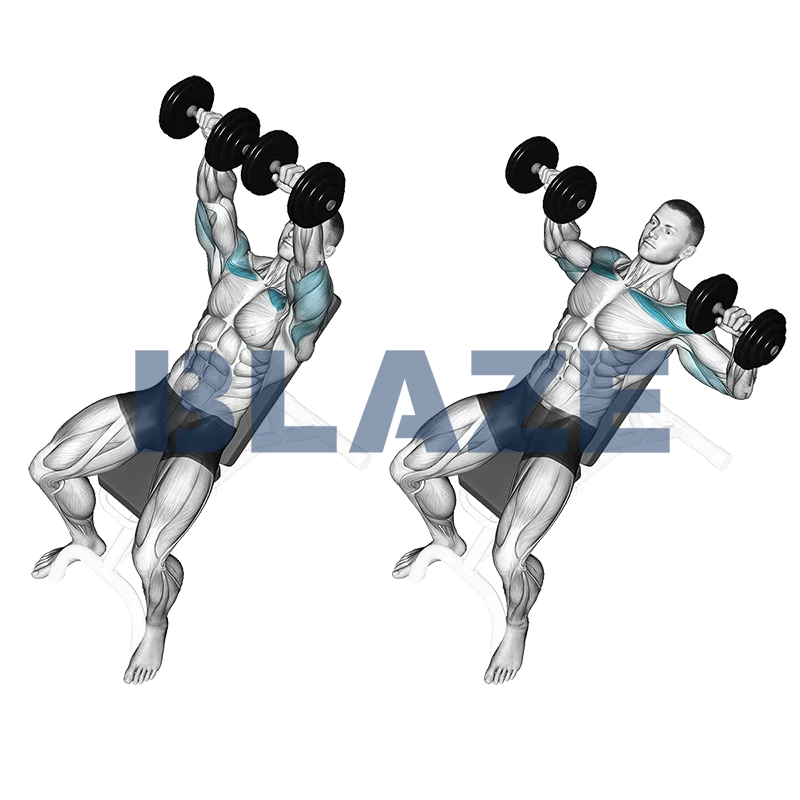
The inclined bench press with dumbbell is a powerful exercise that targets the upper chest, shoulders, and triceps, promoting muscle hypertrophy and strength. Elevating the bench to an incline angle shifts focus to the clavicular head of the pectorals, enhancing upper chest development and improving muscle symmetry. This exercise also activates stabilizing muscles, contributing to overall shoulder stability and functional strength. Athletes benefit from this exercise by gaining increased upper body power and enhanced aesthetics, which are crucial for performance in various sports.
Community Averages
38kg
Avg. weight
83lbs
Avg. weight
* Based on data from the Blaze community
Description
- 1Hold a dumbbell in each hand, sit on a bench inclined at a 45 degrees angle and rest one dumbbell on each knee.
- 2While you lie back on the bench, kick each dumbbell up into position resting on your chest, one at a time.
- 3Position the dumbbells to the sides of your chest and place your feet firmly on the ground.
- 4Exhale as you press the dumbbells upward and inward until your arms are almost fully extended and the dumbbells nearly touch above the center of your face.
- 5Inhale as you slowly lower the dumbbells back to the starting position. For an extra pump, lower the dumbbells beyond the starting position until you feel a slight stretch in your chest.
- 6You have completed your first repetition. Repeat the motion in a controlled way and count your reps.
Tips & Tricks
- •Consistent Angles: Ensure the bench is set at a 30-degree to 45-degree angle. This helps target the upper chest while minimizing strain on the shoulders.
- •Controlled Movement: Lower the dumbbells slowly and with control to maximize muscle engagement and reduce the risk of injury. Avoid letting the weights drop quickly.
- •Elbow Positioning: Keep your elbows at a 45-degree angle to your body. This helps protect your shoulder joints and place more emphasis on the pectoral muscles.
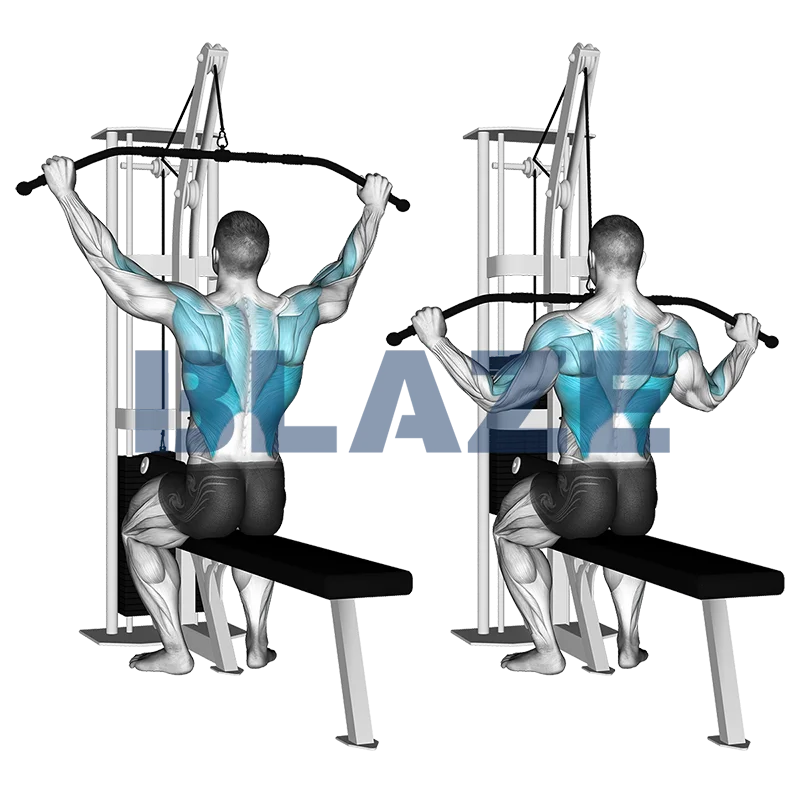
The cable lat pulldown (wide grip) is an effective exercise for building upper body strength and enhancing muscle definition. This movement primarily targets the latissimus dorsi, but it also engages the biceps, rear deltoids, and upper back muscles. Athletes benefit by developing a powerful and balanced upper body, crucial for activities requiring pulling strength and stability. Additionally, this exercise improves posture and can aid in the prevention of shoulder injuries by bolstering supportive muscles around the joint. A versatile addition to any strength training regimen!
Community Averages
45kg
Avg. weight
100lbs
Avg. weight
* Based on data from the Blaze community
Description
- 1Choose a weight that you are comfortable with and sit on the lat pull-down machine. Adjust the machine so that your thighs fit under the supports.
- 2Grasp the bar with an overhand grip, with your hands more than shoulder-width apart.
- 3Exhale as you slowly pull the bar down towards your upper chest. Focus on squeezing your shoulder blades together and hold for a count of two.
- 4Inhale as you slowly return the bar to the starting position, keeping your movements controlled.
- 5Repeat this motion for the recommended number of repetitions, keeping proper form and technique throughout the exercise.
Tips & Tricks
- •Grip Control: Ensure your grip is wide enough to activate your lats effectively but not so wide that it strains your shoulders. A wider grip typically targets the upper part of the lats more intensely.
- •Elbow Position: As you pull down, focus on bringing your elbows down and back. Avoid letting them flare out to maintain tension on your lats.
- •Mind-Muscle Connection: Concentrate on contracting your lats as you pull the bar down. This can help enhance muscle activation and growth.
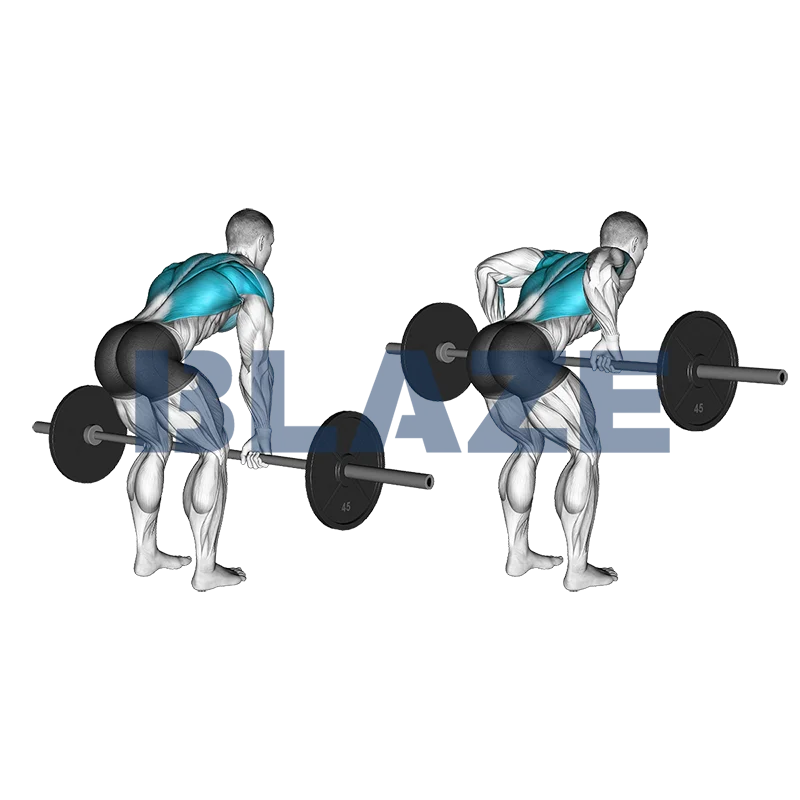
The bent over row with barbell is a highly effective exercise targeting the upper and lower back, shoulders, and biceps. By engaging the latissimus dorsi, rhomboids, trapezius, and the posterior deltoids, it promotes a balanced and strong upper body. This exercise also stabilizes the core and enhances overall posture. Athletes, especially those in sports requiring pulling strength like rowing or climbing, will benefit from improved muscular endurance, strength, and stability. Incorporating this exercise aids in enhancing athletic performance and injury prevention.
Community Averages
44kg
Avg. weight
96lbs
Avg. weight
* Based on data from the Blaze community
Description
- 1Stand over a barbell, the bar should line up with your toes.
- 2Bend your hips and your knees and grasp the barbell with both hands a little wider than shoulder-width apart. Your back should be straight and your spine should form one line with your head.
- 3Flex your core muscles and exhale as you pull the barbell up to your waist or stomach using your arms and the strength of your back and core.
- 4Hold for a count of two and squeeze your back.
- 5Inhale and lower the barbell in a controlled manner until it nearly touches the floor. Keep your core flexed and your back straight.
- 6You have completed your first repetition. Repeat the motion in a controlled way and count your reps.
- 7On completion of your last rep, lower the barbell to the floor.
Tips & Tricks
- •Maintain a Strong Core: Keep your abdominal muscles engaged throughout the exercise to support your lower back.
- •Neutral Spine: Ensure your spine stays neutral, avoiding any rounding or arching to prevent strain on your back.
- •Proper Angle: Bend at your hips so your torso is at about a 45-degree angle to the floor, and keep this angle consistent throughout the movement.
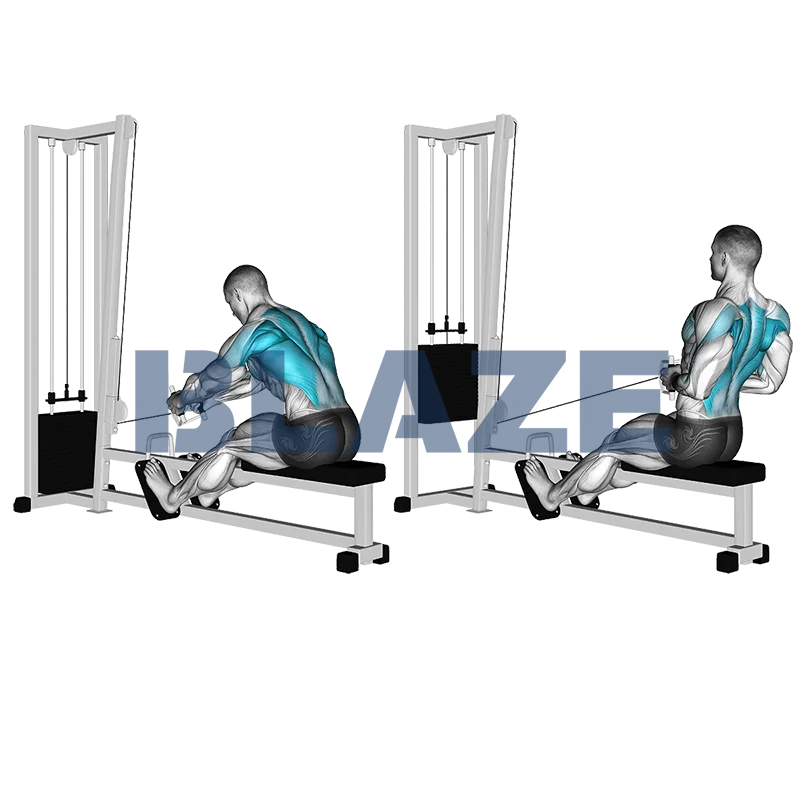
The cable seated row is a strength training exercise that primarily targets the back muscles, specifically the latissimus dorsi, rhomboids, and trapezius. It also engages the biceps and forearms. This exercise is highly beneficial for improving posture, enhancing upper-body strength, and stabilizing the core. Athletes can profit from the Cable Seated Row as it increases pulling power, crucial for sports like climbing, swimming, and rowing. Improved back strength aids in overall athletic performance and injury prevention by ensuring balanced muscle development.
Community Averages
52kg
Avg. weight
114lbs
Avg. weight
* Based on data from the Blaze community
Description
- 1Sit facing the cable row machine and place your feet securely on the foot rests.
- 2Grasp the double-row bar with both hands, then slide your bottom backward until your knees are nearly straight.
- 3Lean your torso forward and allow your arms and shoulders to stretch forward.
- 4Exhale as you lean backward, straighten your back, and pull the v-bar toward your abdomen, keeping your elbows close to your body.
- 5At the top of the movement, pull your shoulders back, stick out your chest, and squeeze your back muscles. Hold for a count of two.
- 6Inhale as you slowly lean forward and return the double-row bar to the starting position, stretching your arms and shoulders forward.
- 7Repeat for the recommended number of repetitions.
Tips & Tricks
- •Maintain Proper Posture: Keep your back straight and avoid rounding your shoulders to prevent injuries and maximize muscle engagement.
- •Controlled Movements: Perform the exercise in a slow and controlled manner to ensure you engage your muscles properly and reduce the risk of injury.
- •Grip Variation: Experiment with different grips, such as a wide grip, narrow grip, or underhand grip, to target different parts of your back muscles.
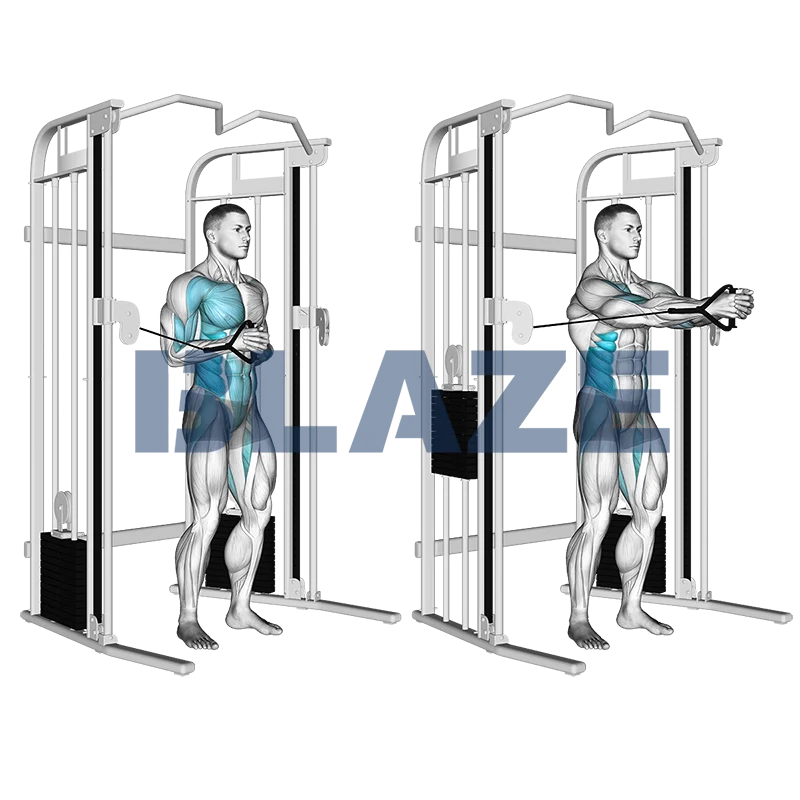
The horizontal pallof press with cable is a core-strengthening exercise that targets the transverse abdominis, obliques, rectus abdominis, and lower back. It also engages stabilizing muscles in the shoulders, chest, and glutes. Benefits include enhanced core stability, improved balance, and better posture. For athletes, this exercise is crucial as it strengthens the core, which is essential for performance in various sports, reducing the risk of injury, and enhancing overall functional strength and power. Its isometric hold aspect helps build enduring stability under tension.
Community Averages
14kg
Avg. weight
32lbs
Avg. weight
* Based on data from the Blaze community
Description
- 1Attach a stirrup (handle) to a chest-high cable pulley.
- 2Stand with your side to the pulley.
- 3Grasp the stirrup with the hand nearest the pulley, pull the stirrup to your chest, and place your free hand over the hand holding the stirrup.
- 4Stand with your knees slightly bent and your feet flat on the floor.
- 5Extend your hands out in front of you until your elbows are locked.
- 6Hold this position for a count of five without allowing your body to rotate.
- 7Bring your hands back to your chest.
- 8Repeat for the prescribed number of repetitions.
- 9Repeat the exercise on your opposite side.
Tips & Tricks
- •Core Engagement: Focus on keeping your core fully engaged throughout the exercise. This helps in stabilizing your spine and prevents undue strain on your back.
- •Neutral Spine: Maintain a neutral spine position. Avoid arching your back or letting it round. This promotes proper posture and reduces the risk of injury.
- •Controlled Movements: Perform the exercise in a controlled manner. Avoid using momentum to press the cable, as this can reduce the effectiveness of the exercise and increase your risk of injury.
Three Day Split - Legs and Shoulders
6 exercises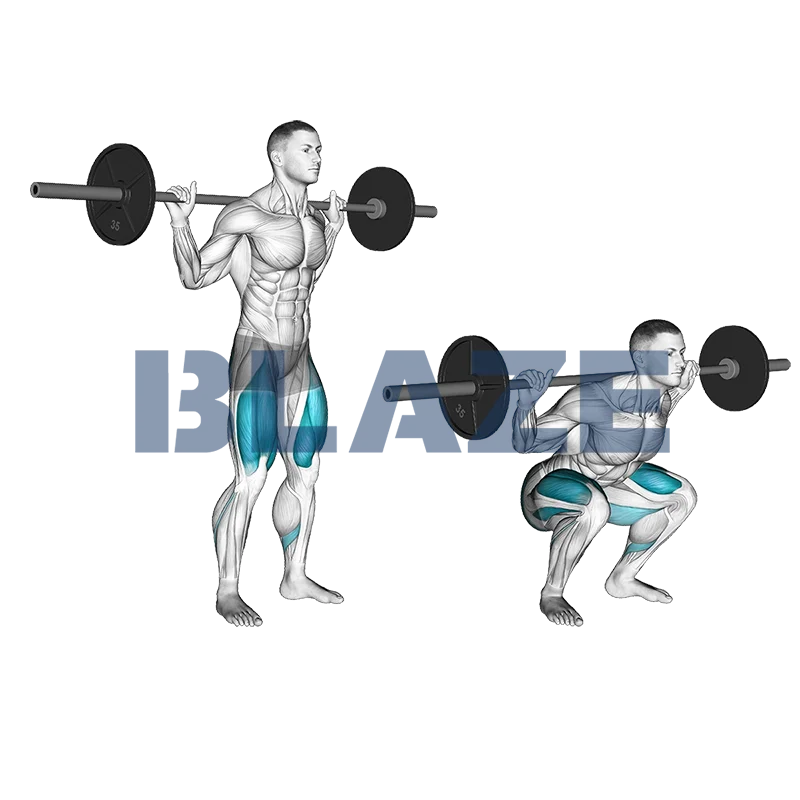
The barbell squat is a foundational exercise that offers multiple benefits, including improved strength, power, and muscle mass. Key muscle groups activated during this exercise include the quadriceps, hamstrings, glutes, and lower back. For athletes, incorporating barbell squats can enhance performance by promoting better balance, agility, and explosiveness, which are crucial for sports like football, basketball, and track. Additionally, squats improve core stability and support injury prevention by strengthening connective tissues and joints.
Community Averages
55kg
Avg. weight
122lbs
Avg. weight
* Based on data from the Blaze community
Description
- 1Load a barbell on a rack at upper-chest level. Step under the barbell so that it rests on the back of your shoulders, and grasp the bar at each side. Hands are slightly wider than shoulder-width apart.
- 2Dismount the barbell and step backward. Your feet should be shoulder-width apart and must slightly point outwards.
- 3Inhale as you squat down by simultaneously pushing the hips back and bending your knees and hips to lower the torso. Keep your torso upright, and descend at least until your knees are bent at a 90-degree angle.
- 4Be careful that your knees do not extend beyond an imaginary line drawn vertically upward from your toes. Instead, push your butt backwards to avoid this.
- 5Exhale as you push your body back up to the starting position, still keeping your torso upright.
- 6You have completed your first repetition. Repeat the motion in a controlled way and count your reps.
Tips & Tricks
- •Warm-Up Thoroughly: Always start with a comprehensive warm-up to prepare your muscles and joints. This can include dynamic stretches and light cardio to get your blood flowing.
- •Head Position: Keep your head facing forward and eyes fixed on a point in front of you. This helps maintain balance and keeps your spine aligned.
- •Chest Up: Ensure your chest is up and your back is neutral throughout the movement. Avoid rounding your back to prevent spinal injuries.
The Smith machine seated shoulder press is a strength training exercise providing numerous benefits, especially for athletes. It primarily targets the deltoids, specifically the anterior and medial heads, while also engaging the triceps and upper chest. This exercise aids in building shoulder strength and stability, essential for various sports requiring upper body prowess. By using the Smith machine, it ensures proper form and reduces the risk of injury. Athletes profit from enhanced shoulder endurance, improved lifting performance, and greater upper body power.
Community Averages
39kg
Avg. weight
86lbs
Avg. weight
* Based on data from the Blaze community
Description
- 1Sit Down: Position yourself on the Shoulder Press Machine and select your desired weight.
- 2Position Your Hands: Grab the handles to your sides, keeping your elbows bent and aligned with your torso. This is your starting position.
- 3Press Up: Exhale as you lift the handles, fully extending your arms. Hold the contraction at the top for one second.
- 4Lower Down: Inhale while slowly lowering the handles back to the starting position.
- 5Repeat: Perform the exercise for the recommended amount of repetitions.
Tips & Tricks
- •Align the Bench and Bar: Ensure the bench is positioned so the bar lines up directly over your shoulders for vertical pressing. This alignment helps in effective targeting of the shoulder muscles.
- •Foot Placement: Keep your feet flat on the ground, about shoulder-width apart. This stable base supports your balance and prevents strain on your lower back.
- •Grip Position: Use a shoulder-width grip. Too wide or too narrow can shift the emphasis away from your shoulders and onto other muscle groups.
The machine leg extension is a strength training exercise targeting the quadriceps, primarily engaging the rectus femoris, vastus lateralis, vastus medialis, and vastus intermedius. This exercise isolates the quads, allowing for focused muscle development, improved knee extension strength, and enhanced overall leg definition. Athletes benefit from increased power and stability in activities requiring leg strength, such as running, jumping, and cycling. Additionally, strong quadriceps support knee joint health, reducing injury risk and improving athletic performance.
Community Averages
51kg
Avg. weight
112lbs
Avg. weight
* Based on data from the Blaze community
Description
- 1Sit on the leg extension machine. Adjust the weight. The backs of your thighs should fully rest on the seat and your back should be fully supported by the back rest.
- 2Lock your feet under the foot pads of the lever with the pads resting slightly above your ankles. Grasp the side handles for support.
- 3Exhale as you lift the foot pad forward and upward until your legs are fully extended.
- 4Hold there for one second and then inhale as you return to the starting position.You have completed your first repetition. Repeat the motion in a controlled way and count your reps.
Tips & Tricks
- •Make sure the machine is properly adjusted to fit your body. The axis of rotation of the machine should align with your knee joint to avoid unnecessary strain.
- •Keep your back firmly against the seat and avoid arching it.
- •Grip the handles to stabilize your upper body and prevent leveraging off the machine.

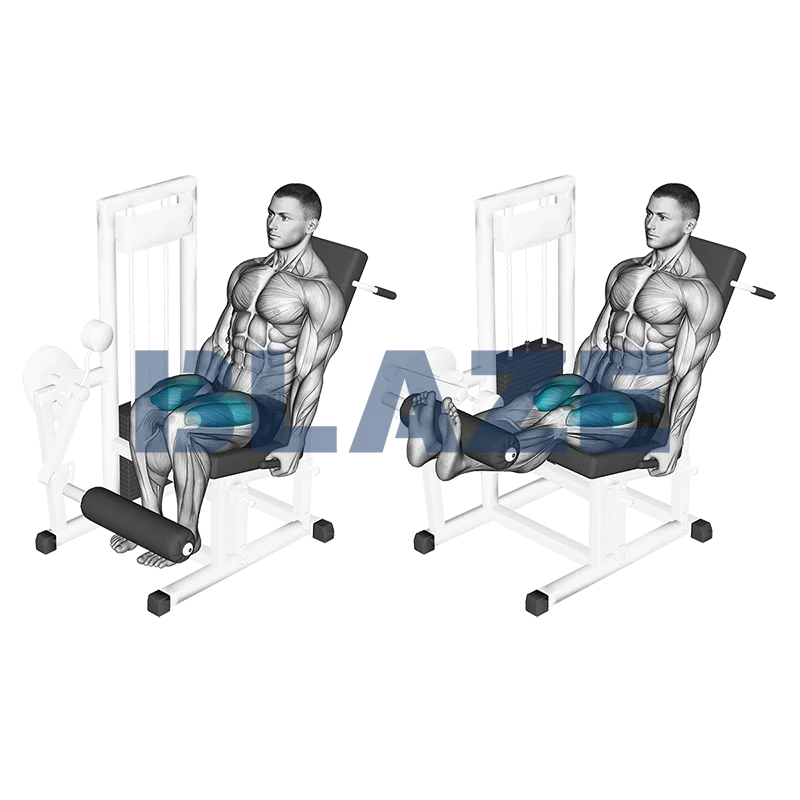
The machine seated leg curl is a highly effective exercise focusing primarily on the hamstrings, with secondary activation of the calf muscles. This exercise is pivotal for athletes as it enhances lower body strength, contributes to muscle balance, and reduces the risk of injury. Efficiently targeting the hamstrings, it aids in improved sprinting speed, jumping ability, and overall leg endurance. The machine's controlled motion ensures proper form, making it suitable for both beginners and advanced athletes aiming to optimize their performance and athletic capabilities.
Community Averages
43kg
Avg. weight
94lbs
Avg. weight
* Based on data from the Blaze community
Description
- 1Adjust the Machine: Ensure the machine’s pads are set up so they sit comfortably against your lower back when seated.
- 2Position Your Legs: Place your legs on the padded lever so it rests just below your calf muscles.
- 3Secure the Lap Pad: Adjust the lap pad so it sits securely on your thighs, just above the knees.
- 4Lift and Grip: Straighten your legs out in front of you and grasp the side handles of the machine.
- 5Execute the Movement: Pull the padded lever down and back towards you using your legs as far as you can.
- 6Hold and Return: Hold the position for a second, then slowly return the lever back to the starting position.
- 7Repeat the movement in a controlled manner for your desired number of repetitions.
Tips & Tricks
- •Ensure the pad is adjusted to rest comfortably against the back of your lower legs just above the ankles. This helps in maximizing the range of motion.
- •Breathe out as you curl the weight towards you and breathe in as you slowly return to the starting position. Controlled breathing can enhance your focus and performance.
- •Perform each repetition through a full range of motion to effectively target your hamstrings. Avoid partial reps to prevent muscle imbalances.
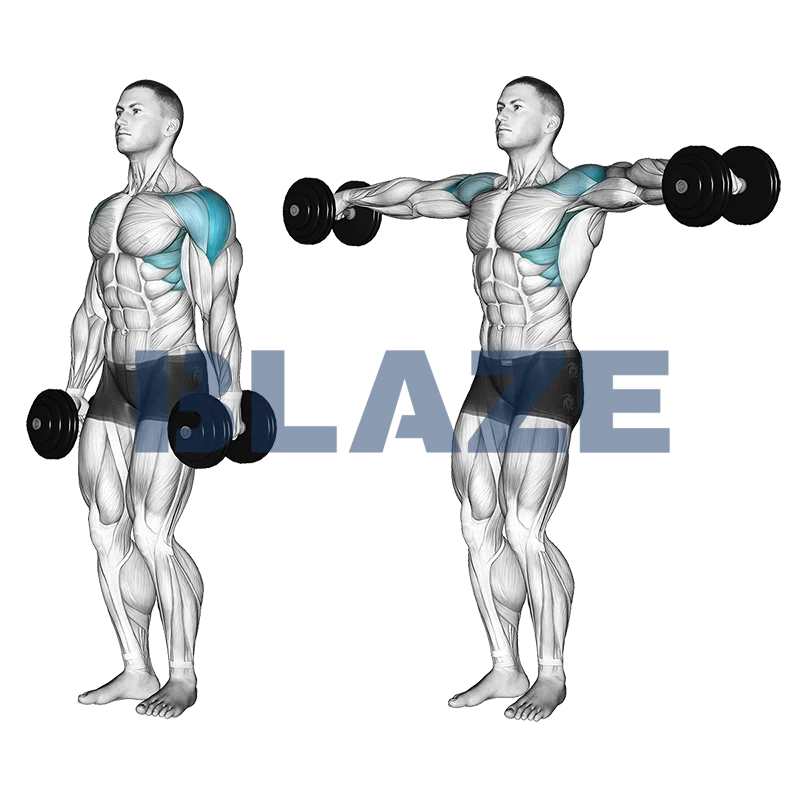
The dumbbell lateral raise primarily targets the lateral deltoids, providing definition and strength to the shoulders. Additionally, it involves the anterior deltoids, trapezius, and rotator cuff muscles. Benefits include enhanced shoulder width, improved posture, and better shoulder stability, crucial for athletic performance. Athletes profit from this exercise as it contributes to stronger and more balanced shoulder muscles, reducing the risk of injuries and improving overall upper body strength and aesthetics. It's an essential move for building a robust shoulder profile and enhancing athletic capabilities.
Community Averages
16kg
Avg. weight
34lbs
Avg. weight
* Based on data from the Blaze community
Description
- 1Stand upright and hold a dumbbell in each hand with the dumbbells hanging down by your sides. Keep your elbows slightly bent during the whole exercise.
- 2Exhale as you raise both arms to the sides until your arms form one line with your shoulders.Inhale and lower the dumbbells into the starting position.
- 3You have completed your first repetition. Repeat the motion in a controlled way and count your reps.
Tips & Tricks
- •Maintain Proper Form: Keep a slight bend in your elbows to reduce the strain on your elbow joints. This will help maintain tension in your shoulder muscles.
- •Neutral Wrist Position: Keep your wrists in a neutral position-avoid letting them bend forward or backward. This helps to protect your wrists and ensure that the focus remains on your shoulders.
- •Controlled Movement: Lift and lower the dumbbells slowly and with control. Avoid using momentum to lift the weights, which can reduce the effectiveness of the exercise and increase the risk of injury.
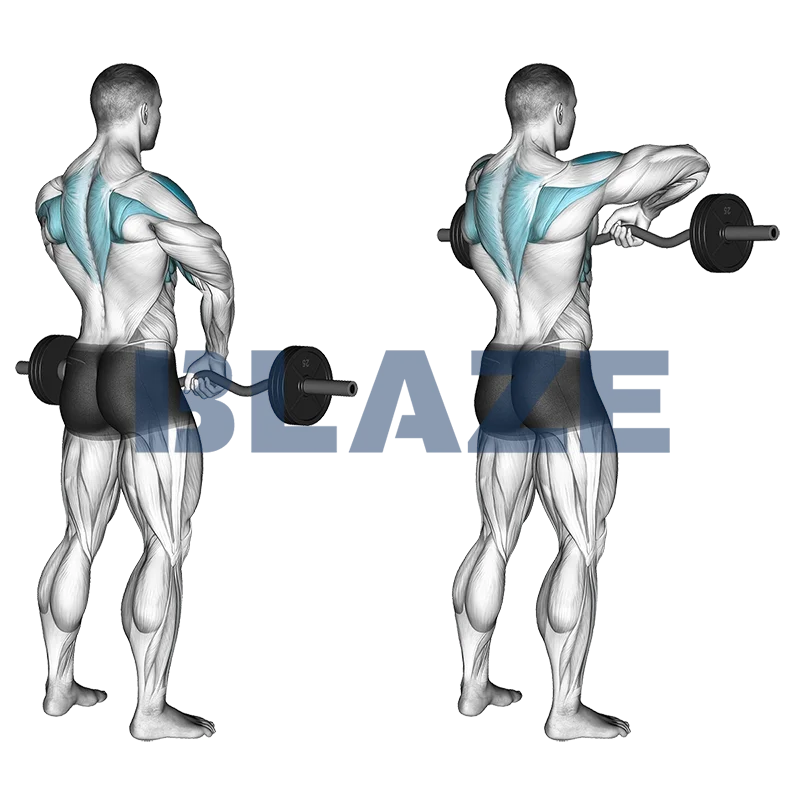
Community Averages
17kg
Avg. weight
39lbs
Avg. weight
* Based on data from the Blaze community
Description
- 1Stand tall with your feet shoulder-width apart, holding an EZ bar in front of your thighs using a shoulder-width, overhand grip.
- 2Exhale as you lift the bar, pulling it up towards your lower or middle chest. Do not pull the bar any higher.
- 3Hold the bar at the top position for a count of two, ensuring you maintain good form.
- 4Inhale as you slowly lower the bar back to the starting position in a controlled manner.
- 5Repeat the lifting and lowering motion for the prescribed number of repetitions.
Tips & Tricks
- •Grip Technique: Use a wide grip to better focus on your shoulders rather than your traps. Your hands should be placed wider than shoulder-width apart on the EZ bar.
- •Controlled Movement: Always lift and lower the bar in a controlled manner. Avoid using momentum, which can cause improper form and potential injury.
- •Elbow Positioning: Keep your elbows higher than your forearms throughout the movement. This ensures that the shoulders are doing the majority of the work.
Three Day Split - Arms and Core
6 exercises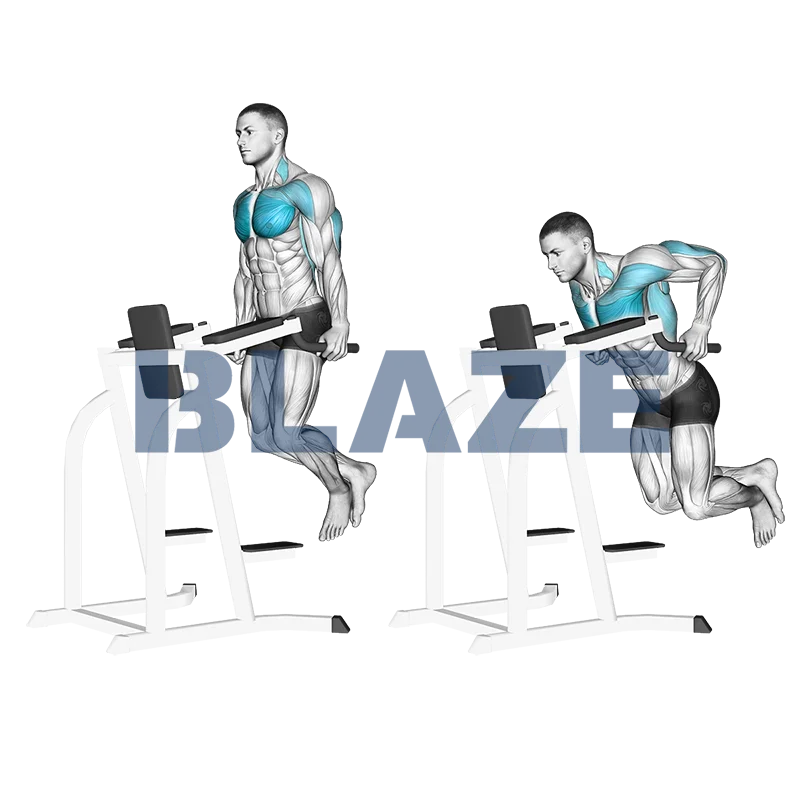
Chest dips are a powerful exercise targeted at building upper body strength. This compound movement primarily activates the pectoral muscles, triceps, and anterior deltoids. Additional muscles, such as the rhomboids, levator scapulae, and latissimus dorsi, also get engaged, enhancing overall upper body muscle coordination and balance. Athletes benefit from chest dips as they contribute to improved pushing strength, aiding in sports that require upper body power. The exercise also enhances muscle endurance and promotes better shoulder stability, crucial for performance and injury prevention.
Community Averages
9
Avg. reps/set
* Based on data from the Blaze community
Description
- 1Stand between the shoulder-width dip bars and grasp each bar firmly, straightening your arms to lift your legs off the ground. Keep your body upright.
- 2Keeping your elbows tucked in close to your body, begin to inhale and slowly lower your body until your elbows form a 90-degree angle or you feel a slight stretch in your shoulders.
- 3Exhale as you push your body back up to the starting position, maintaining control throughout the movement.
- 4Repeat the exercise for the recommended number of repetitions, ensuring you maintain proper form with each dip.
Tips & Tricks
- •Chest Forward, Elbows Wide: Lean your torso forward and allow your elbows to flare out slightly. This adjustment shifts the focus towards your chest rather than your triceps.
- •Stable Grip: Ensure a firm grip on the parallel bars to maintain stability throughout the movement. Use your hands to drive the movement, but avoid squeezing too hard, as this can cause undue strain.
- •Control Your Descent: Lower yourself in a controlled manner to maximize muscle engagement. The descent should be slow and deliberate to avoid any injury and to ensure proper muscle activation.
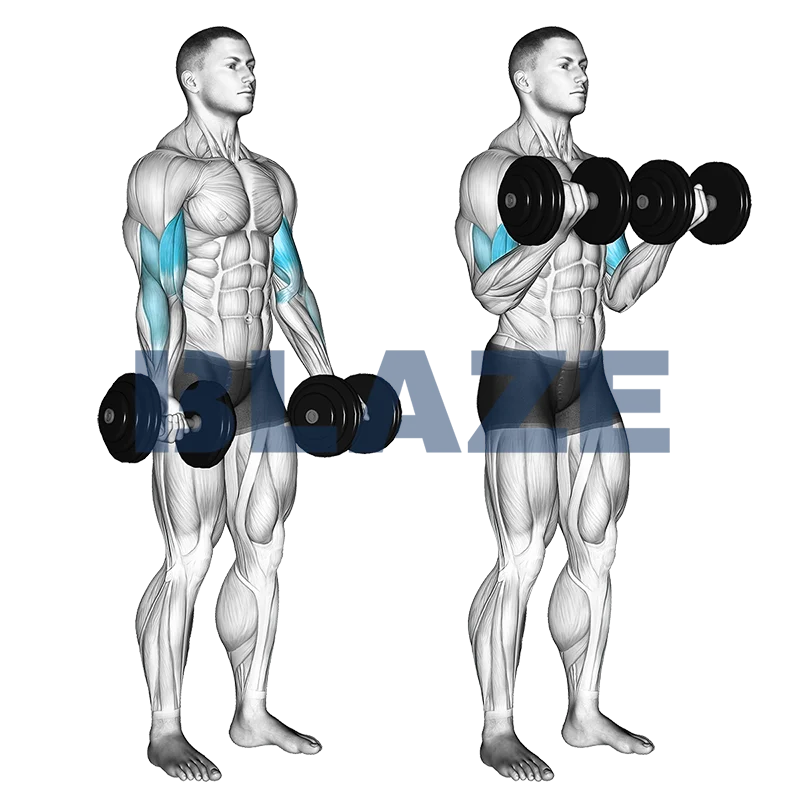
The biceps curl with dumbbell is a fundamental strength training exercise that targets the biceps brachii, primarily activating the biceps while also engaging the brachialis and brachioradialis. This exercise significantly improves muscle strength and size in the upper arms, making it a staple for athletes seeking enhanced arm definition and performance. Additionally, it helps improve grip strength and forearm stability, which are crucial for athletes in sports requiring strong lifting and pulling motions. This exercise is versatile, effective, and promotes overall upper-arm muscularity and function.
Community Averages
20kg
Avg. weight
44lbs
Avg. weight
* Based on data from the Blaze community
Description
- 1Start Position: Stand with a dumbbell in each hand, using a supinated grip (palms facing forward), and let them hang by your sides.
- 2Curl Dumbbells: Exhale and simultaneously curl both dumbbells up towards your shoulders. Your palms should rotate to face your shoulders at the top.
- 3Adjust Elbows: Once your elbows are fully flexed, move them slightly forward so your forearms are vertical.
- 4Hold Position: Hold the position for a count of two.
- 5Lower Dumbbells: Inhale and slowly lower the dumbbells back to the starting position.
- 6Repeat: Perform the movement for the prescribed number of repetitions.
Tips & Tricks
- •Use a Moderate Weight: Start with a weight that allows you to maintain proper form, but still challenges your muscles by the last few reps.
- •Keep Your Elbows Stationary: Ensure your elbows stay close to your torso and do not move forward or backward during the curl. This isolates the biceps effectively.
- •Engage Your Core: Keep your core tight and your back straight to prevent swaying and to maintain stability.
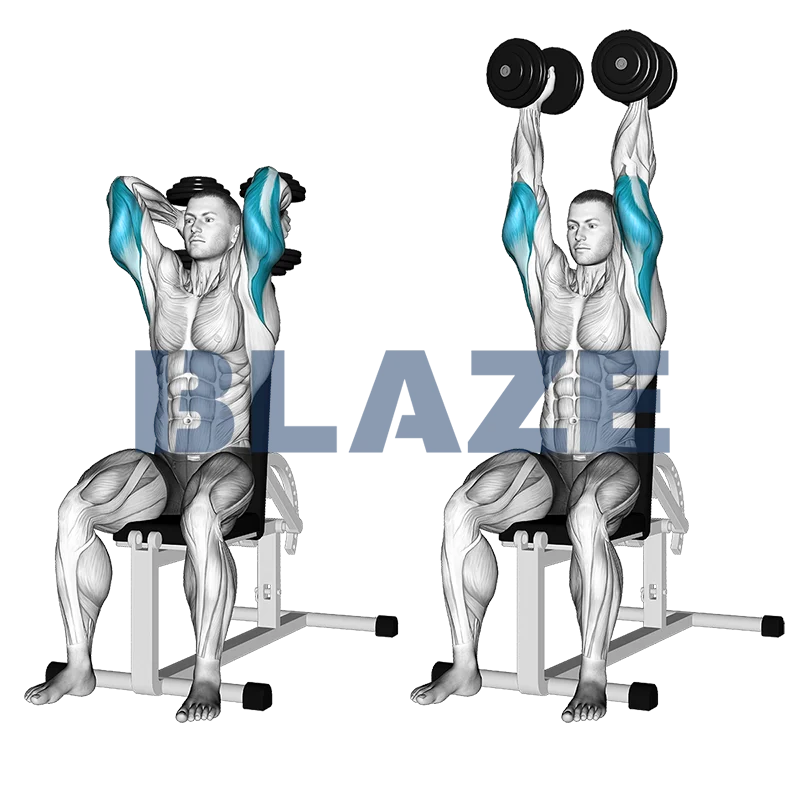
The dumbbell seated triceps extension is a beneficial exercise for enhancing upper arm strength and definition. Specifically targeting the triceps brachii, it also engages the deltoids and core for stabilization. Athletes profit from this exercise by improving arm power, which is crucial for activities requiring pushing strength, like bench press or throwing sports. Additionally, it aids in muscle symmetry and joint stability, reducing injury risk and enhancing overall arm functionality. This exercise is particularly effective in developing the posterior chain, essential for balanced muscle development.
Community Averages
20kg
Avg. weight
45lbs
Avg. weight
* Based on data from the Blaze community
Description
- 1Sit on a flat bench and rest the dumbbells on your thighs.
- 2Kick the dumbbells up with your knees and rest them on your shoulders. Your palms should be facing each other.
- 3Raise the dumbbells above your head until your arms are almost fully extended. Keep your elbows close to your head and pointing upwards during the exercise.
- 4Inhale as you slowly lower the dumbbells until you feel a slight stretch in your triceps.
- 5Exhale as you raise the dumbbell up to the starting position.
- 6You have completed your first repetition. Repeat the motion in a controlled way and count your reps.
Tips & Tricks
- •Starting with the Right Weight: Select a weight that challenges you but still allows you to maintain proper form throughout the entire set. It's always better to start lighter and increase the weight as you get more comfortable with the exercise.
- •Proper Posture: Sit with your back straight and feet flat on the ground. Engaging your core can help maintain stability and prevent any unnecessary swaying or arching of the back.
- •Controlled Movements: Focus on making slow, controlled movements throughout the exercise. Lower the dumbbell behind your head slowly and push it up steadily to ensure you're engaging the triceps effectively and reducing the risk of injury.
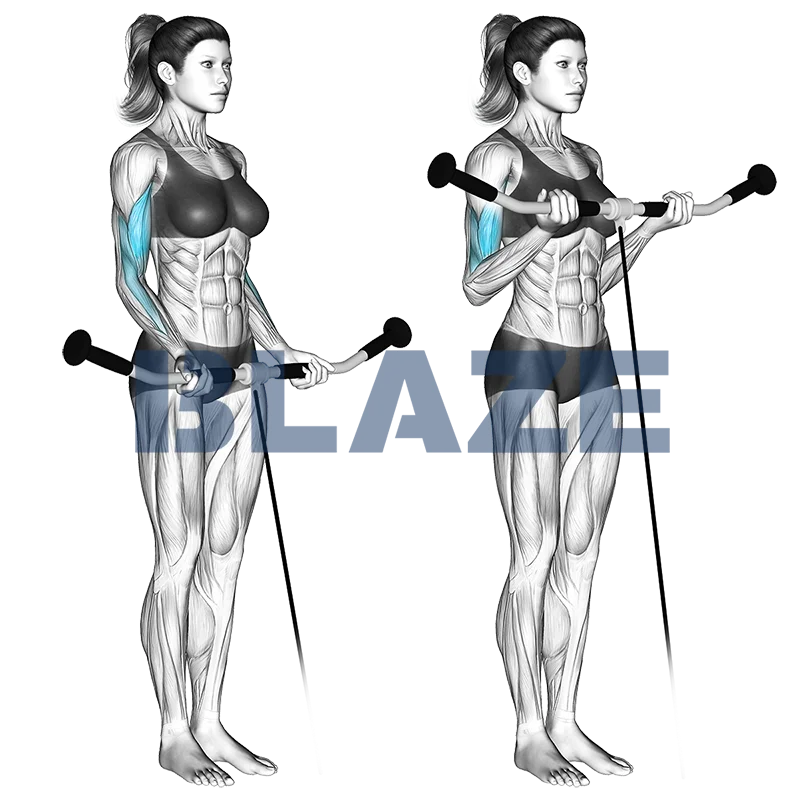
The cable biceps curl is an excellent exercise for developing the biceps, enhancing both strength and size. It targets the biceps brachii, brachialis, and brachioradialis, providing a comprehensive arm workout. The stable resistance offered by the cable machine leads to continuous tension, optimizing muscle activation and growth. Athletes benefit from improved grip strength, increased power for pulling movements, and superior arm aesthetics, which can translate to better performance in sports requiring strong, functional upper body muscles.
Community Averages
24kg
Avg. weight
53lbs
Avg. weight
* Based on data from the Blaze community
Description
- 1Attach a bar to a low cable pulley.Grasp the bar using a shoulder-width underhand grip.
- 2Step back about one foot from the pulley, leaning slightly backwards.
- 3Keep your elbows by your sides and arms almost fully extended.
- 4Exhale as you curl the bar towards your shoulders, fully flexing your elbows.
- 5Allow your elbows to move forward slightly until your forearms are vertical.
- 6Hold this position for a count of two, squeezing your biceps.
- 7Inhale as you lower the bar back to the starting position.
- 8Repeat the exercise for the desired number of repetitions.
Tips & Tricks
- •Adjust the Weight Properly: Before you start, make sure the weight is set according to your fitness level. Too heavy, and you risk improper form; too light, and you won't challenge your muscles effectively.
- •Stable Positioning: Stand with your feet shoulder-width apart and keep a firm grip on the ground. This helps with maintaining balance and proper posture.
- •Elbow Consistency: Keep your elbows close to your body and minimize their movement throughout the exercise. This focuses the effort on your biceps rather than other muscle groups.
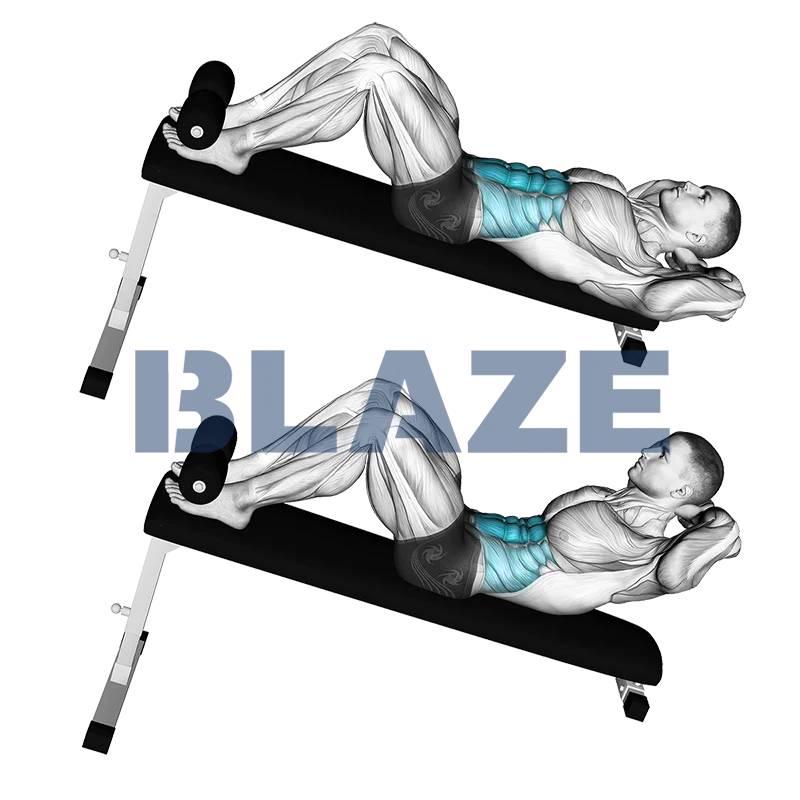
The declined crunch targets the core, particularly the rectus abdominis and obliques. By performing this exercise on a decline bench, athletes benefit from increased resistance, enhancing muscle engagement and calorie burning. This exercise also stabilizes the lower back and improves overall strength and posture. Athletes will find that stronger core muscles translate to better performance in other activities, such as running, lifting, and various sports, by providing greater balance and power.
Community Averages
17
Avg. reps/set
* Based on data from the Blaze community
Description
- 1Lie on your back on a declined bench and hook your feet under the rolls.
- 2Position your hands either across your chest or behind your head or neck.
- 3Press your lower back against the bench to protect it.
- 4Exhale as you raise your head and shoulders off the bench by flexing your abdomen. Hold for a count of two.
- 5Inhale as you lower your head and shoulders back to the starting position. Relax your abdomen.
- 6Repeat for the prescribed number of repetitions.
Tips & Tricks
- •Focus on Muscle Engagement: Ensure that you are tensing your abdominal muscles throughout the entire movement. This will maximize the effectiveness of the exercise and prevent unnecessary strain on your lower back.
- •Controlled Movements: Perform each crunch in a slow and controlled manner. Rapid movements can reduce the exercise's effectiveness and increase the risk of injury.
- •Proper Breathing: Exhale as you crunch up and inhale as you lower back down. Proper breathing enhances muscle contraction and helps maintain rhythm.
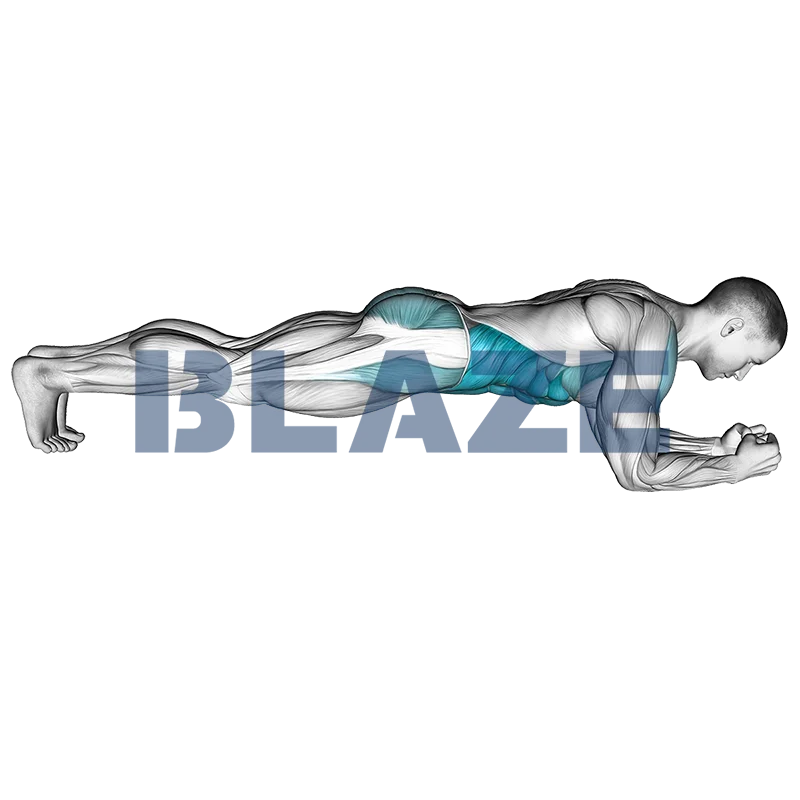
The front plank is a fundamental core exercise offering numerous benefits. Engaging the abdominals, lower back, glutes, hips, and shoulders, it enhances stability and strength in the core region. This exercise is crucial for athletes as it improves posture, reduces the risk of back injuries, and enhances overall athletic performance by providing a solid foundation for movement. Planks also bolster body awareness and coordination, essential for maintaining proper form and efficiency in various sports and physical activities.
Community Averages
0:01:15
Avg. duration
* Based on data from the Blaze community
Description
- 1Rest your knees, feet and elbows on a gym mat.
- 2Extend your feet backward and straighten your whole body so that only your toes and your elbows touch the ground. Your feet should be close together and your elbows should be positioned directly under your shoulders.
- 3Make sure that your lower back sags or your butt rises. Instead, ensure that your body is straight and rigid. Your core muscles must be contracted during the whole exercise.
- 4Hold this position for the desired period of time.
- 5Then go back to the starting position to rest. You have completed your first repetition.
Tips & Tricks
- •Maintain Proper Alignment: Make sure your body forms a straight line from your shoulders to your heels. Avoid letting your hips sag or rise too high.
- •Engage Your Core: Tighten your abdominal muscles as if bracing for a punch. This helps to stabilize your spine and maintain proper form.
- •Avoid Neck Strain: Keep your neck in line with your spine by looking at a spot on the floor just a few inches in front of your hands.
Start this workout in the Blaze app
Download Blaze Workout Tracker and follow this plan with guided sets and tracking.