Upper Lower Body 4 Day Split Extreme Workout
The Extreme FourDay Split is a balanced routine that focuses on both the upper and lower body across four training days. It is structured as two upper body and two lower body workouts. This split allows for ample recovery while maximizing strength and muscle growth. Upper body days focus on the chest, back, shoulders, and arms, while lower body days target the quads, hamstrings, glutes, and calves. This routine is perfect for intermediate lifters aiming to build strength and muscle in a well-rounded, efficient manner.
Day 1: Extreme Split - Upper Body Part 1
7 exercises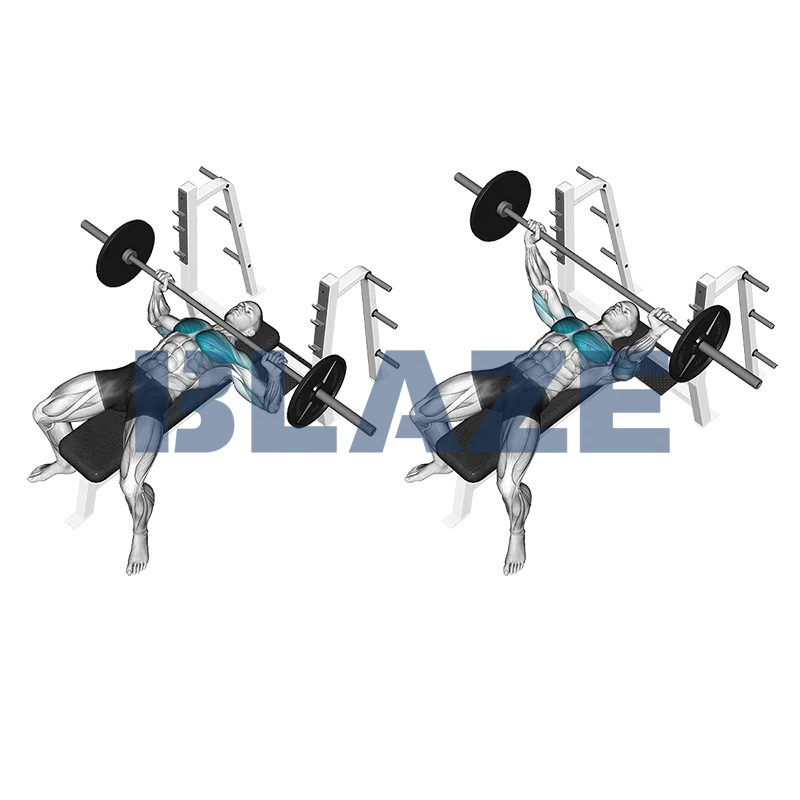
The barbell bench press is a foundational strength-training exercise that offers numerous benefits. It primarily targets the pectoral muscles (chest), deltoids (shoulders), and triceps, promoting upper body strength and hypertrophy. This exercise also engages stabilizing muscles in the back and core, enhancing overall balance and stability. Athletes can profit from the Barbell Bench Press as it increases pushing power, essential for various sports, and improves upper body endurance, contributing to better performance and physical conditioning.
Community Averages
51kg
Avg. weight
112lbs
Avg. weight
* Based on data from the Blaze community
Description
- 1Lie with your back on a flat bench. The bar should be on the level of your eyes.
- 2Place your feet firmly on the ground. Grasp the bar with both hands, your hands should be shoulder-width apart.
- 3Straighten your wrists when holding the barbell. Push the bar upwards until your arms are almost fully extended.
- 4Inhale as you lower the barbell to your chest.
- 5Exhale as you press the barbell back up to the starting position.
- 6You have completed your first repetition. Repeat the motion in a controlled way and count your reps.
Tips & Tricks
- •Arch Your Back: Maintain a slight arch in your lower back to engage your chest muscles more effectively and protect your spine.
- •Foot Placement: Firmly plant your feet on the ground. This stability allows you to generate more power throughout the lift.
- •Grip Width: Use a grip that’s slightly wider than shoulder-width. A narrower grip can put more strain on your shoulders, while a very wide grip can limit your range of motion.
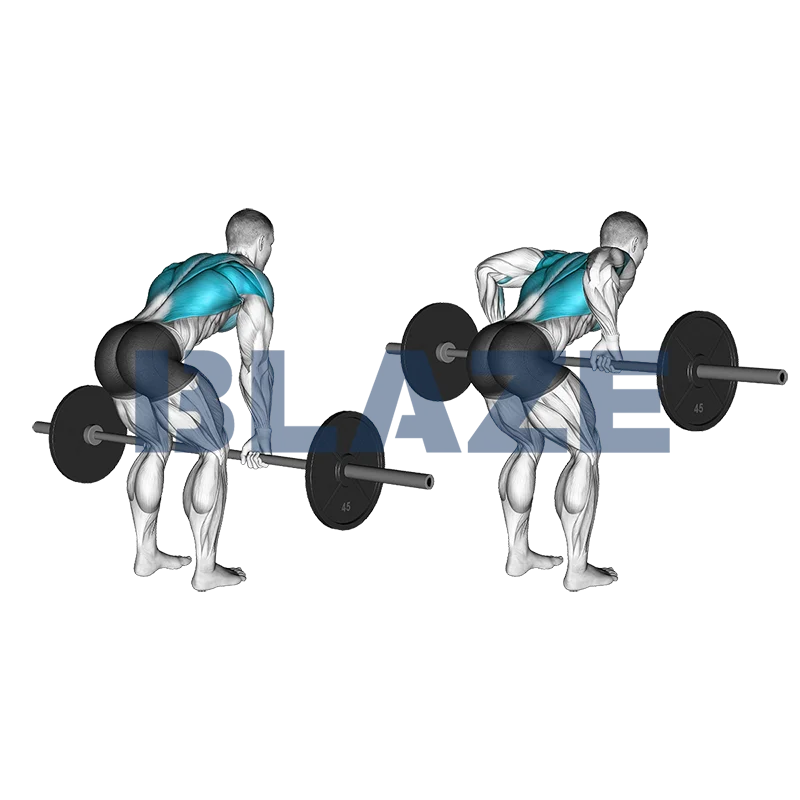
The bent over row with barbell is a highly effective exercise targeting the upper and lower back, shoulders, and biceps. By engaging the latissimus dorsi, rhomboids, trapezius, and the posterior deltoids, it promotes a balanced and strong upper body. This exercise also stabilizes the core and enhances overall posture. Athletes, especially those in sports requiring pulling strength like rowing or climbing, will benefit from improved muscular endurance, strength, and stability. Incorporating this exercise aids in enhancing athletic performance and injury prevention.
Community Averages
44kg
Avg. weight
96lbs
Avg. weight
* Based on data from the Blaze community
Description
- 1Stand over a barbell, the bar should line up with your toes.
- 2Bend your hips and your knees and grasp the barbell with both hands a little wider than shoulder-width apart. Your back should be straight and your spine should form one line with your head.
- 3Flex your core muscles and exhale as you pull the barbell up to your waist or stomach using your arms and the strength of your back and core.
- 4Hold for a count of two and squeeze your back.
- 5Inhale and lower the barbell in a controlled manner until it nearly touches the floor. Keep your core flexed and your back straight.
- 6You have completed your first repetition. Repeat the motion in a controlled way and count your reps.
- 7On completion of your last rep, lower the barbell to the floor.
Tips & Tricks
- •Maintain a Strong Core: Keep your abdominal muscles engaged throughout the exercise to support your lower back.
- •Neutral Spine: Ensure your spine stays neutral, avoiding any rounding or arching to prevent strain on your back.
- •Proper Angle: Bend at your hips so your torso is at about a 45-degree angle to the floor, and keep this angle consistent throughout the movement.
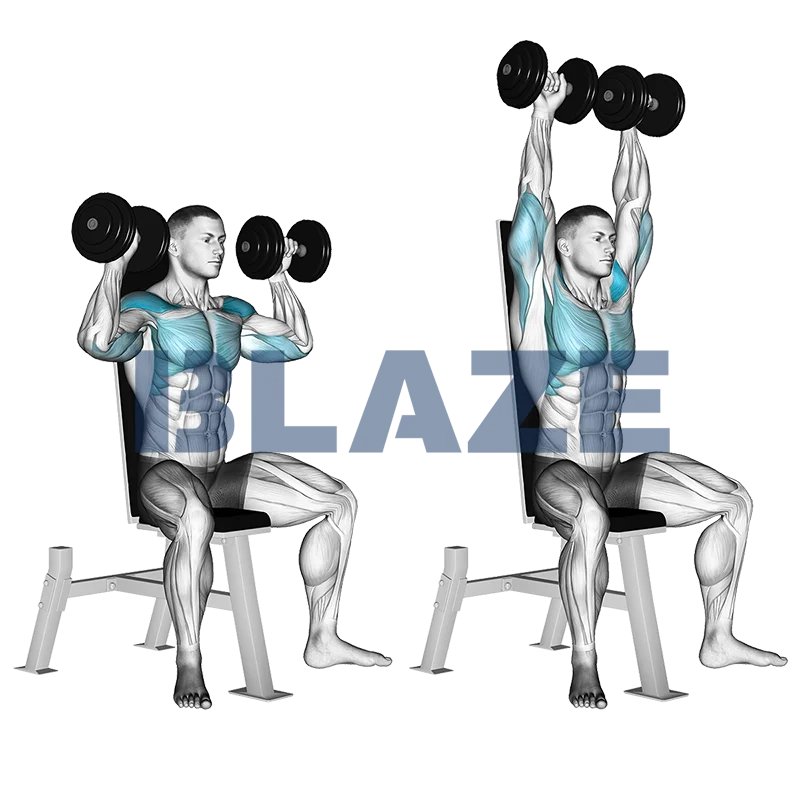
The dumbbell seated shoulder press offers numerous benefits, including enhanced shoulder strength, improved upper body stability, and increased muscle mass. This exercise primarily targets the deltoids, triceps, and upper pectorals, while also engaging the core for stabilization. Athletes profit from this exercise as it translates to greater shoulder endurance and power, critical for performance in sports like swimming, basketball, and baseball. It's also effective for achieving balanced muscle development and reducing the risk of shoulder injuries.
Community Averages
29kg
Avg. weight
64lbs
Avg. weight
* Based on data from the Blaze community
Description
- 1Stand up straight and hold a barbell with a shoulder-width supinated grip (palms facing upward). Your arms should be almost fully extended and the barbell should rest against your thighs.
- 2Keep your body still. Exhale as you curl the barbell up towards your shoulders until your elbows are fully flexed.
- 3Allow your elbows to move forward slightly (shoulder flexion) until your forearms are vertical.
- 4Hold this position for a count of two while squeezing your biceps.
- 5Inhale as you slowly lower the barbell back to the starting position, keeping control of the movement.
- 6Repeat the exercise for the recommended number of repetitions.
Tips & Tricks
- •Stabilize Your Core: Engage your core muscles throughout the exercise to maintain proper form and prevent lower back strain.
- •Controlled Movements: Avoid using momentum. Lift and lower the dumbbells in a controlled manner to maximize muscle engagement and minimize risks of injury.
- •Avoid Locking Elbows: When you reach the top of the press, do not lock your elbows. Keeping a slight bend protects your joints and keeps tension on the muscles.
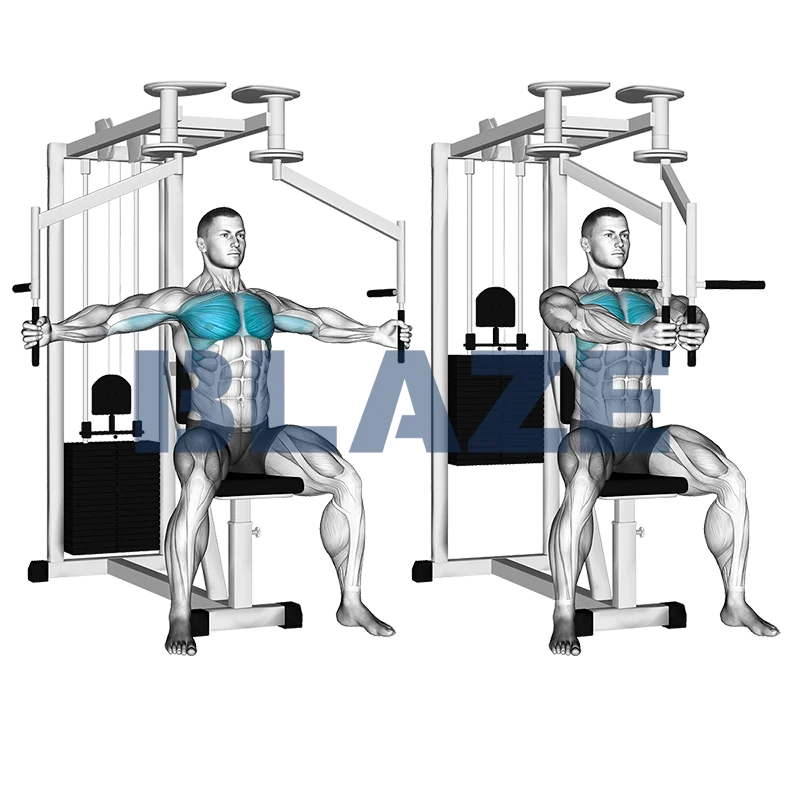
The machine seated chest fly exercise primarily targets the pectoral muscles, specifically the chest, and also engages the deltoids and biceps. This exercise is beneficial for enhancing upper body strength, improving muscular endurance, and promoting muscle symmetry. Athletes can profit from incorporating the machine Seated Fly into their training regimen as it aids in building a powerful chest, which is crucial for sports requiring upper body power, such as swimming and football. Additionally, it offers controlled, isolated movement, reducing injury risk.
Community Averages
41kg
Avg. weight
91lbs
Avg. weight
* Based on data from the Blaze community
Description
- 1Sit on the fly machine with your back pressed firmly against the back support.
- 2Grasp the levers positioned at shoulder height.
- 3Internally rotate your shoulders to align your wrists, elbows, and shoulders.
- 4Keep your elbows slightly bent throughout the exercise.
- 5Exhale as you push the levers together in front of you.
- 6Inhale and slowly reverse the motion until you feel a mild stretch in your chest or shoulders.
- 7Return to the starting position and repeat the exercise as necessary.
Tips & Tricks
- •Adjust the Seat Height: Ensure that the seat is at the correct height so that the handles are at chest level. This will allow for the proper range of motion and optimal muscle engagement.
- •Secure Your Back and Shoulders: Keep your back firmly against the backrest and your shoulders stabilized throughout the movement. This helps target your pectoral muscles more effectively while preventing strain on your shoulders.
- •Grip Position: Use a comfortable, overhand grip. Your palms should be facing each other, and your wrists should be in a straight, neutral position to avoid unnecessary strain.
Community Averages
105kg
Avg. weight
232lbs
Avg. weight
* Based on data from the Blaze community
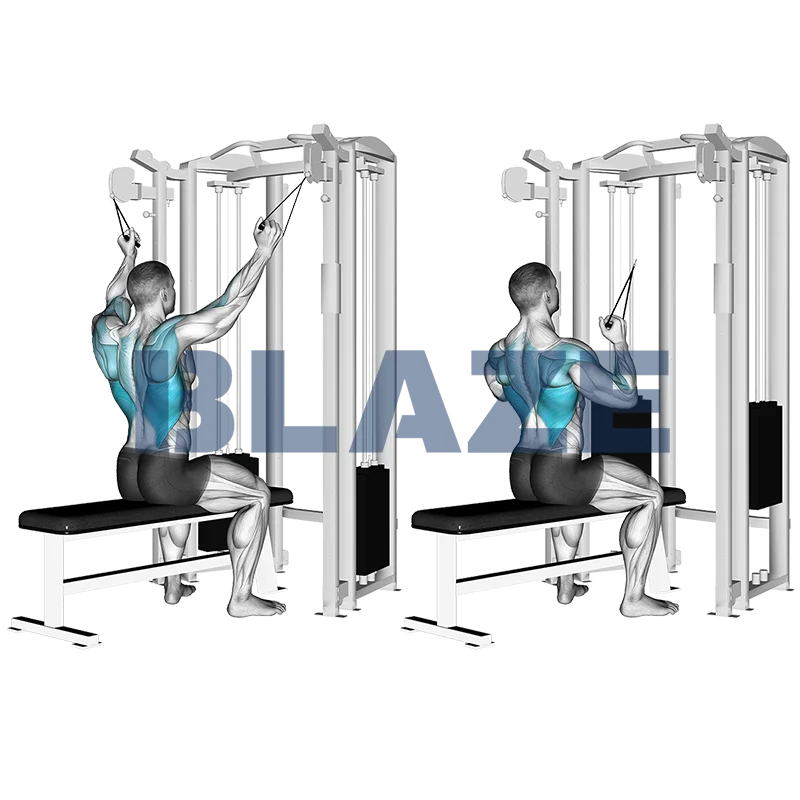
Description
- 1Attach a stirrup (handle) to two high cable pulleys. Position a bench or chair midway between the two pulleys.
- 2Grasp a stirrup in each hand and sit directly under the pulleys, holding the stirrups using a neutral (aka parallel) grip (palms facing each other).
- 3Exhale as you pull the stirrups downward until your elbows are by your sides.
- 4Hold for a count of two, stick out your chest, and squeeze your back muscles.
- 5Inhale as you return the stirrups to the starting position, with your arms fully extended and shoulders stretched upward.
- 6Repeat.
Tips & Tricks
- •Engage Your Core: Keep your core engaged throughout the exercise to maintain a stable torso and avoid excessive swinging or using momentum.
- •Control the Movement: Focus on a controlled movement throughout the entire range of motion. Avoid allowing the weights to pull your arms back up too quickly. Controlling the eccentric (lifting) phase is just as important as the concentric (lowering) phase.
- •Full Range of Motion: Aim to pull the cable grips down until they reach approximately shoulder level. Fully extend your arms at the top of the movement to engage the latissimus dorsi muscles properly.
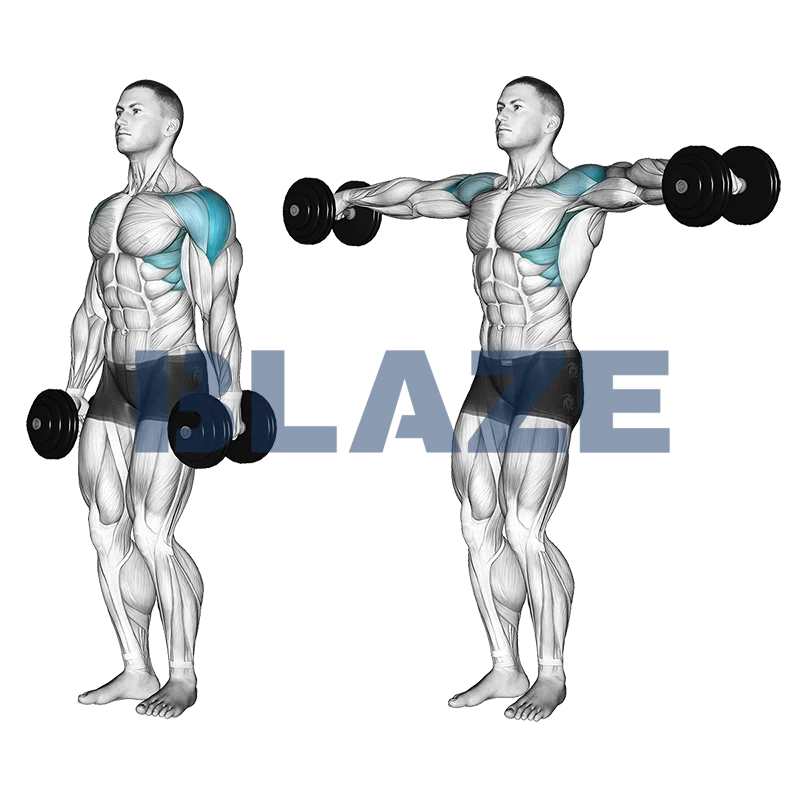
The dumbbell lateral raise primarily targets the lateral deltoids, providing definition and strength to the shoulders. Additionally, it involves the anterior deltoids, trapezius, and rotator cuff muscles. Benefits include enhanced shoulder width, improved posture, and better shoulder stability, crucial for athletic performance. Athletes profit from this exercise as it contributes to stronger and more balanced shoulder muscles, reducing the risk of injuries and improving overall upper body strength and aesthetics. It's an essential move for building a robust shoulder profile and enhancing athletic capabilities.
Community Averages
16kg
Avg. weight
34lbs
Avg. weight
* Based on data from the Blaze community
Description
- 1Stand upright and hold a dumbbell in each hand with the dumbbells hanging down by your sides. Keep your elbows slightly bent during the whole exercise.
- 2Exhale as you raise both arms to the sides until your arms form one line with your shoulders.Inhale and lower the dumbbells into the starting position.
- 3You have completed your first repetition. Repeat the motion in a controlled way and count your reps.
Tips & Tricks
- •Maintain Proper Form: Keep a slight bend in your elbows to reduce the strain on your elbow joints. This will help maintain tension in your shoulder muscles.
- •Neutral Wrist Position: Keep your wrists in a neutral position-avoid letting them bend forward or backward. This helps to protect your wrists and ensure that the focus remains on your shoulders.
- •Controlled Movement: Lift and lower the dumbbells slowly and with control. Avoid using momentum to lift the weights, which can reduce the effectiveness of the exercise and increase the risk of injury.
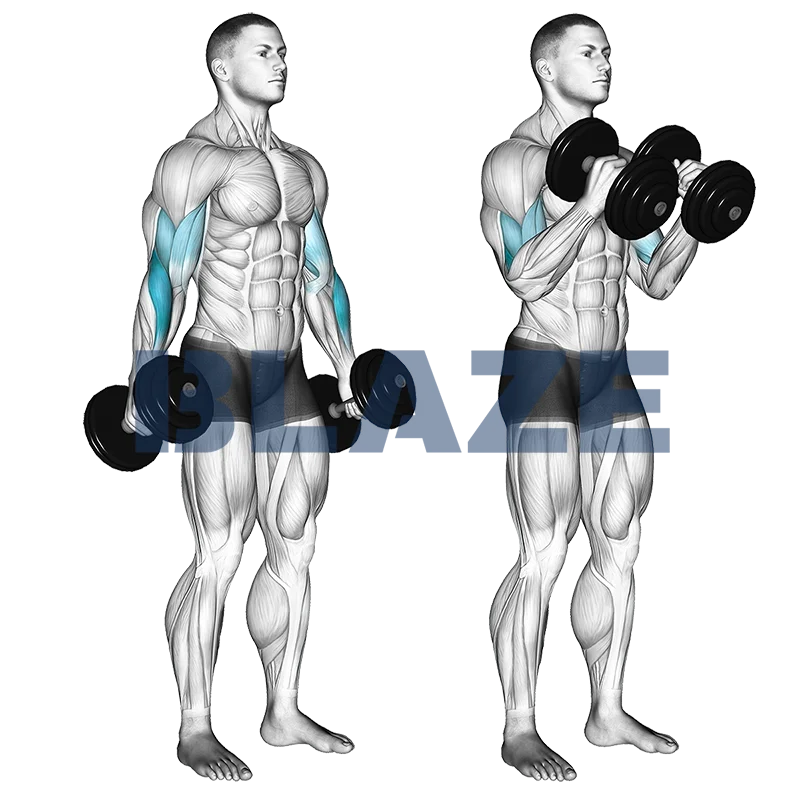
The dumbbell hammer curl is a versatile strength training exercise that primarily targets the brachialis, brachioradialis, and biceps brachii muscles. By maintaining a neutral grip throughout the movement, this exercise effectively isolates the forearm and upper arm muscles, promoting balanced development and increased overall arm strength. Athletes benefit from enhanced grip strength and improved performance in sports requiring arm and hand power. Additionally, this exercise supports injury prevention by fortifying the muscles and tendons surrounding the elbow joint. Ideal for boosting arm functionality and aesthetics.
Community Averages
24kg
Avg. weight
54lbs
Avg. weight
* Based on data from the Blaze community
Description
- 1Stand with your feet shoulder-width apart, holding a dumbbell in each hand using a neutral grip (palms facing in).
- 2Keep your elbows by your sides throughout the exercise.
- 3Exhale as you curl one dumbbell up towards your shoulder, contracting your biceps fully.
- 4Hold for two seconds and squeeze your biceps.
- 5Inhale as you slowly lower the dumbbell back to the starting position.
- 6Repeat the movement with your opposite arm.
- 7Keep alternating arms for the desired number of repetitions.
- 8Remember to breathe throughout the exercise and maintain proper form.
Tips & Tricks
- •Maintain Proper Posture: Stand tall with your chest up and shoulders back. This will help you engage the right muscles and avoid strain on your back.
- •Elbow Position: Keep your elbows close to your torso throughout the movement. This isolates the biceps and forearms, ensuring effective muscle engagement.
- •Controlled Movement: Avoid swinging the weights. Lift and lower the dumbbells in a controlled manner to maximize muscle tension and avoid injury.
Day 2: Extreme Split - Lower Body Part 1
4 exercises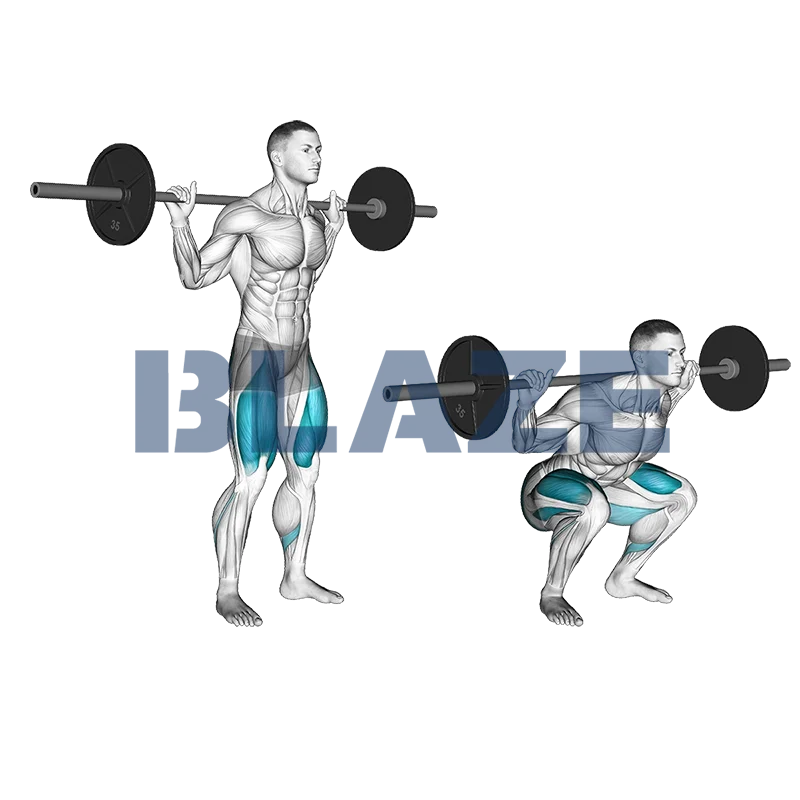
The barbell squat is a foundational exercise that offers multiple benefits, including improved strength, power, and muscle mass. Key muscle groups activated during this exercise include the quadriceps, hamstrings, glutes, and lower back. For athletes, incorporating barbell squats can enhance performance by promoting better balance, agility, and explosiveness, which are crucial for sports like football, basketball, and track. Additionally, squats improve core stability and support injury prevention by strengthening connective tissues and joints.
Community Averages
55kg
Avg. weight
122lbs
Avg. weight
* Based on data from the Blaze community
Description
- 1Load a barbell on a rack at upper-chest level. Step under the barbell so that it rests on the back of your shoulders, and grasp the bar at each side. Hands are slightly wider than shoulder-width apart.
- 2Dismount the barbell and step backward. Your feet should be shoulder-width apart and must slightly point outwards.
- 3Inhale as you squat down by simultaneously pushing the hips back and bending your knees and hips to lower the torso. Keep your torso upright, and descend at least until your knees are bent at a 90-degree angle.
- 4Be careful that your knees do not extend beyond an imaginary line drawn vertically upward from your toes. Instead, push your butt backwards to avoid this.
- 5Exhale as you push your body back up to the starting position, still keeping your torso upright.
- 6You have completed your first repetition. Repeat the motion in a controlled way and count your reps.
Tips & Tricks
- •Warm-Up Thoroughly: Always start with a comprehensive warm-up to prepare your muscles and joints. This can include dynamic stretches and light cardio to get your blood flowing.
- •Head Position: Keep your head facing forward and eyes fixed on a point in front of you. This helps maintain balance and keeps your spine aligned.
- •Chest Up: Ensure your chest is up and your back is neutral throughout the movement. Avoid rounding your back to prevent spinal injuries.
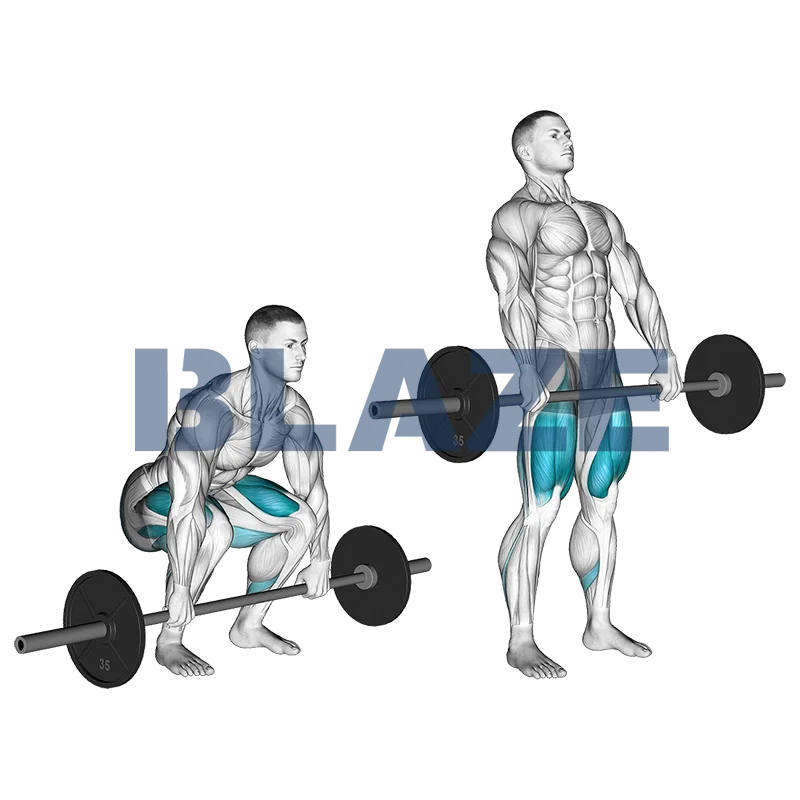
The barbell deadlift is a powerful full-body exercise that offers numerous benefits for athletes. It primarily targets the glutes, hamstrings, lower back, traps, and core. The exercise promotes muscle growth, enhances strength, and improves posture. Additionally, it aids in developing grip strength and increasing power output, vital for athletic performance. By engaging multiple muscle groups, the deadlift supports functional movement patterns, making it an essential exercise for athletes looking to enhance overall strength and conditioning.
Community Averages
64kg
Avg. weight
142lbs
Avg. weight
* Based on data from the Blaze community
Description
- 1Setup: Stand with your feet hip-width apart under the barbell. The bar should be positioned halfway over your feet when you look down.
- 2Grip: Bend down and grasp the barbell with a shoulder-width grip.
- 3Prepare: Take a deep breath, ensuring your torso is upright and your back and arms are straight.
- 4Lift: Stand up by driving with your legs, pulling the bar up the front of your legs.
- 5Top Position: At the top of the lift, squeeze your glutes, pull your shoulders back, and exhale.
- 6Lower:*Push your butt backward and lower the bar down the front of your legs, keeping your back straight.
- 7Finish: Once the bar passes your knees, bend your knees and place the bar back on the floor. Repeat as needed.
Tips & Tricks
- •Engage Your Core: Always keep your core muscles tight to support your spine and maintain good form throughout the lift.
- •Proper Foot Placement: Position your feet hip-width apart with your toes slightly pointing outwards. Make sure the barbell is over the middle of your feet.
- •Grip Tightness: Use a strong overhand grip. If the weight is heavy, consider using a mixed grip (one hand overhand, one hand underhand) or using lifting straps.
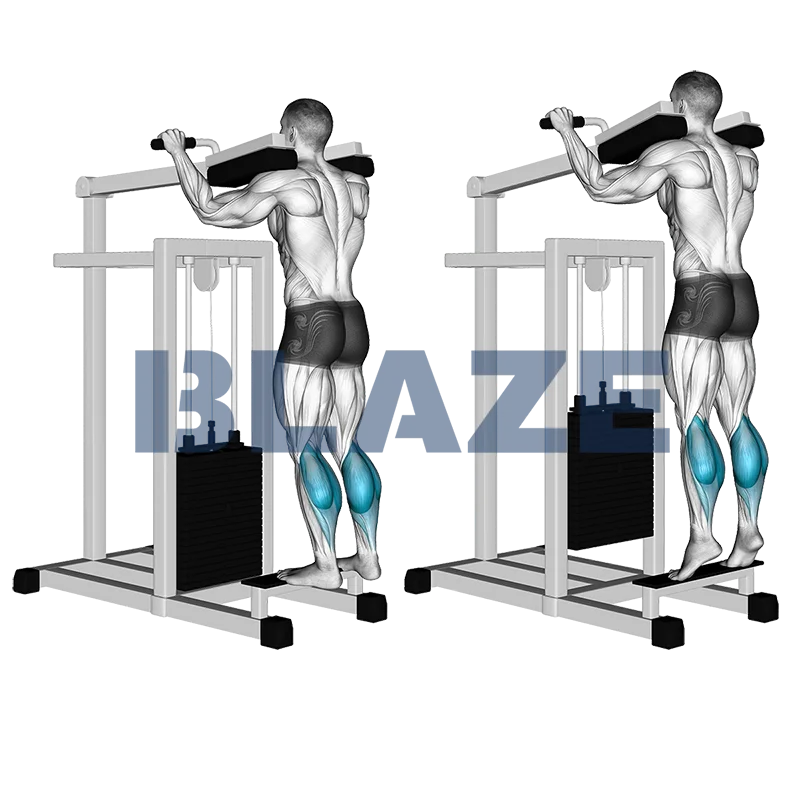
The machine standing calf raise is a powerful exercise focusing on the calf muscles, specifically targeting the gastrocnemius and soleus. This movement strengthens and stabilizes the lower legs, crucial for improved balance and athletic performance. Athletes benefit from enhanced propulsion, reduced injury risk, and better agility. By engaging the calves, the exercise indirectly supports stronger ankle joints, contributing to overall lower body strength and endurance. Ideal for runners, jumpers, and those in need of explosive leg power, this exercise is a must for athletic development.
Community Averages
60kg
Avg. weight
132lbs
Avg. weight
* Based on data from the Blaze community
Description
- 1Stand on the calf raise machine with the levers resting on your shoulders.
- 2Position the balls of your feet on the platform, with the arches and heels of your feet extending off the platform.
- 3Grasp the handles for support.
- 4Exhale as you raise your heels by using your calf muscles and push the shoulder levers up as far as possible. Hold in this position for one second.
- 5Inhale as you lower the levers until you feel a slight stretch in your calves. Keep your body straight during the whole motion.
- 6You have completed your first repetition. Repeat the motion in a controlled way and count your reps.
Tips & Tricks
- •Full Range of Motion: Ensure you achieve a full range of motion by lowering your heels as far as possible and then extending fully onto your toes. This will maximize muscle engagement and effectiveness.
- •Controlled Movement: Focus on controlled movements rather than bouncing. Keep the motion slow and deliberate to engage the calf muscles completely and avoid injury.
- •Proper Foot Positioning: Position your feet parallel and shoulder-width apart on the platform. This helps distribute the weight evenly and targets the calves effectively.
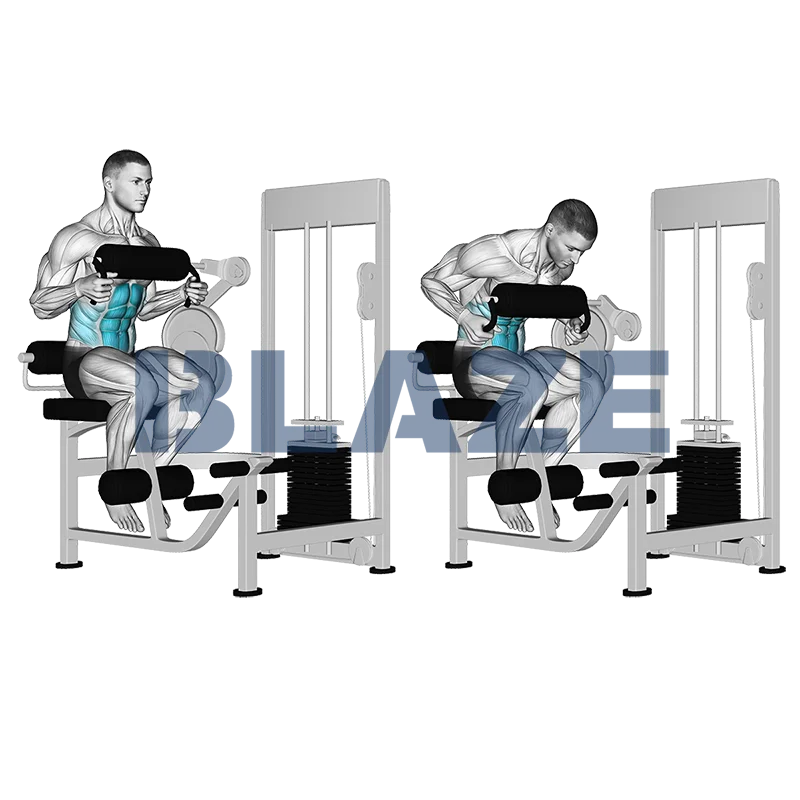
The machine seated crunch offers outstanding benefits for core strengthening by primarily targeting the rectus abdominis muscles, while also engaging the obliques and hip flexors. This exercise enhances core stability, crucial for overall athletic performance, balance, and injury prevention. Athletes profit from improved posture and stronger core muscles, translating to better endurance and power in their respective sports. The seated position provides controlled movement, making it accessible yet challenging for varying fitness levels.
Community Averages
15
Avg. reps/set
* Based on data from the Blaze community
Description
- 1Sit in the ab machine with your back resting against the back support and your chest against the padded lever.
- 2Hook your feet under the foot pads.
- 3Grasp the handles for support.
- 4Exhale and push the padded lever down with your chest by flexing your waist, keeping your hips fixed.
- 5Hold for a count of two.
- 6Inhale as you return the padded lever to the starting position in a controlled manner by extending your waist.
- 7Relax your waist before repeating.
Tips & Tricks
- •Proper Setup: Ensure that the seat and chest pad are adjusted to fit your body. This alignment helps in engaging the core muscles correctly and avoids unnecessary strain.
- •Controlled Movements: Perform the crunch in a slow, controlled manner. Avoid using momentum to ensure that your abs are doing the work. This helps in maximizing the muscle engagement and effectiveness of the exercise.
- •Breathing: Exhale as you crunch forward, squeezing your abs tightly, and inhale as you return to the starting position. Proper breathing ensures optimal performance and prevents fatigue.
Day 3: Extreme Split - Upper Body Part 2
6 exercises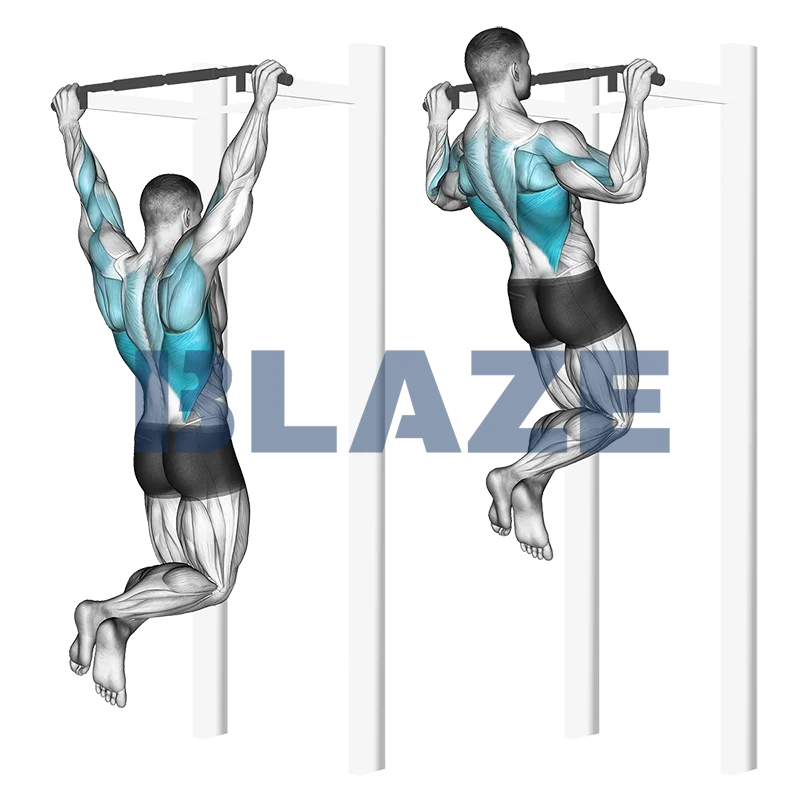
The pull up is a powerful bodyweight exercise that targets various upper body muscles, especially the latissimus dorsi, biceps, and trapezius. It significantly enhances back strength, improves grip, and develops overall upper body muscle endurance. Athletes gain from pull-ups by building functional strength, improving upper body stability, and enhancing performance in sports requiring upper body coordination and power. This exercise also aids in improving posture and spinal alignment, reducing the risk of injuries.
Community Averages
7
Avg. reps/set
* Based on data from the Blaze community
Description
- 1Grasp the bar with a slightly wider than shoulder-width pronated grip.
- 2Hang with your arms and shoulders fully stretched. Your feet must not touch the ground.
- 3Exhale as you pull your whole body up until your chin rises above the bar. Hold for one second.
- 4Inhale as you lower your body until your arms and shoulders are fully stretched and you have reached your starting position.
- 5You have completed your first repetition. Repeat the motion in a controlled way and count your reps.
Tips & Tricks
- •Engage Your Core: Keep your core tight and engaged throughout the exercise to maintain stability and improve form.
- •Full Range of Motion: Aim to bring your chin above the bar and lower yourself until your arms are fully extended. This ensures that you are working your muscles through their entire range.
- •Controlled Movements: Avoid swinging or using momentum. Focus on smooth, controlled movements to maximize engagement of your back and arm muscles.
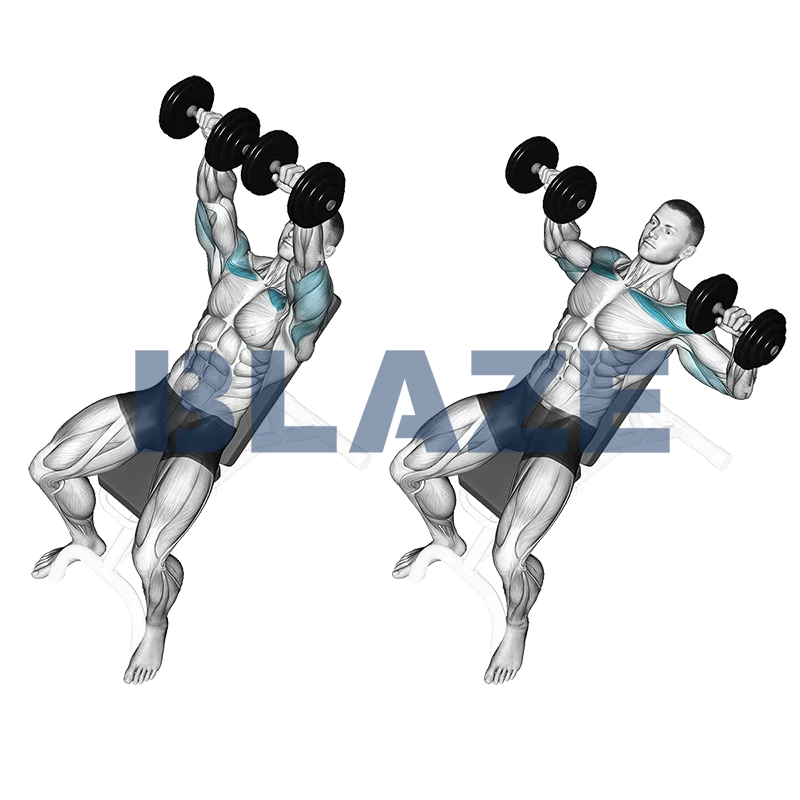
The inclined bench press with dumbbell is a powerful exercise that targets the upper chest, shoulders, and triceps, promoting muscle hypertrophy and strength. Elevating the bench to an incline angle shifts focus to the clavicular head of the pectorals, enhancing upper chest development and improving muscle symmetry. This exercise also activates stabilizing muscles, contributing to overall shoulder stability and functional strength. Athletes benefit from this exercise by gaining increased upper body power and enhanced aesthetics, which are crucial for performance in various sports.
Community Averages
38kg
Avg. weight
83lbs
Avg. weight
* Based on data from the Blaze community
Description
- 1Hold a dumbbell in each hand, sit on a bench inclined at a 45 degrees angle and rest one dumbbell on each knee.
- 2While you lie back on the bench, kick each dumbbell up into position resting on your chest, one at a time.
- 3Position the dumbbells to the sides of your chest and place your feet firmly on the ground.
- 4Exhale as you press the dumbbells upward and inward until your arms are almost fully extended and the dumbbells nearly touch above the center of your face.
- 5Inhale as you slowly lower the dumbbells back to the starting position. For an extra pump, lower the dumbbells beyond the starting position until you feel a slight stretch in your chest.
- 6You have completed your first repetition. Repeat the motion in a controlled way and count your reps.
Tips & Tricks
- •Consistent Angles: Ensure the bench is set at a 30-degree to 45-degree angle. This helps target the upper chest while minimizing strain on the shoulders.
- •Controlled Movement: Lower the dumbbells slowly and with control to maximize muscle engagement and reduce the risk of injury. Avoid letting the weights drop quickly.
- •Elbow Positioning: Keep your elbows at a 45-degree angle to your body. This helps protect your shoulder joints and place more emphasis on the pectoral muscles.
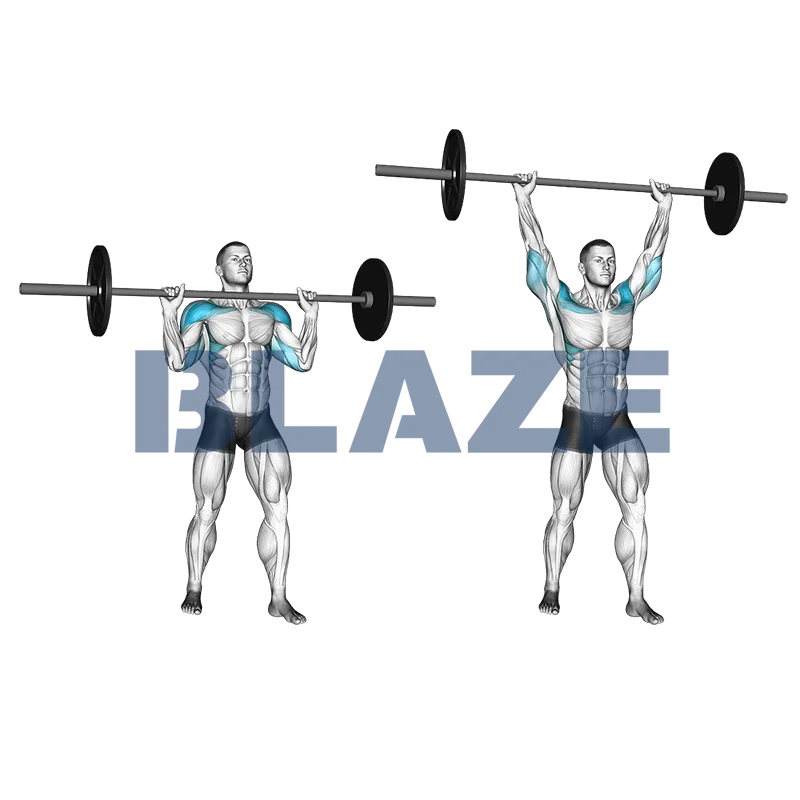
The standing military press (with barbell) is an effective compound exercise ideal for developing upper body strength. Key benefits include enhanced shoulder muscle hypertrophy, improved core stability, and better lifting performance. This exercise primarily targets the deltoids, triceps, and upper pectorals while also engaging the core for stabilization. Athletes profit from the Standing Military Press due to its functional strength gains, which translate into improved performance in various sports activities and daily tasks requiring upper body power and coordination.
Community Averages
33kg
Avg. weight
72lbs
Avg. weight
* Based on data from the Blaze community
Description
- 1Set up a barbell on a squat rack at chest height. Select appropriate weights.
- 2Stand under the bar and grasp it with a pronated grip, wider than shoulder-width apart.
- 3Slightly bend your knees and position the barbell on your collarbone.
- 4Lift the barbell to rest on your chest, then step back and position your feet shoulder-width apart.
- 5Press the barbell overhead by extending your arms until they are locked, with the bar slightly in front of your head.
- 6Lower the barbell to your collarbone slowly while inhaling.
- 7Press the barbell back up to the starting position as you exhale.
- 8Repeat for the recommended number of repetitions.
Tips & Tricks
- •Engage Your Core: Tighten your core muscles throughout the movement to maintain stability and support your lower back. This prevents excessive arching and potential injury.
- •Grip Width: Ensure your grip is slightly wider than shoulder-width. This helps in better activation of the shoulder muscles and improves the range of motion.
- •Wrist Alignment: Keep your wrists straight and in line with your forearms to avoid unnecessary strain and reduce the risk of injury.
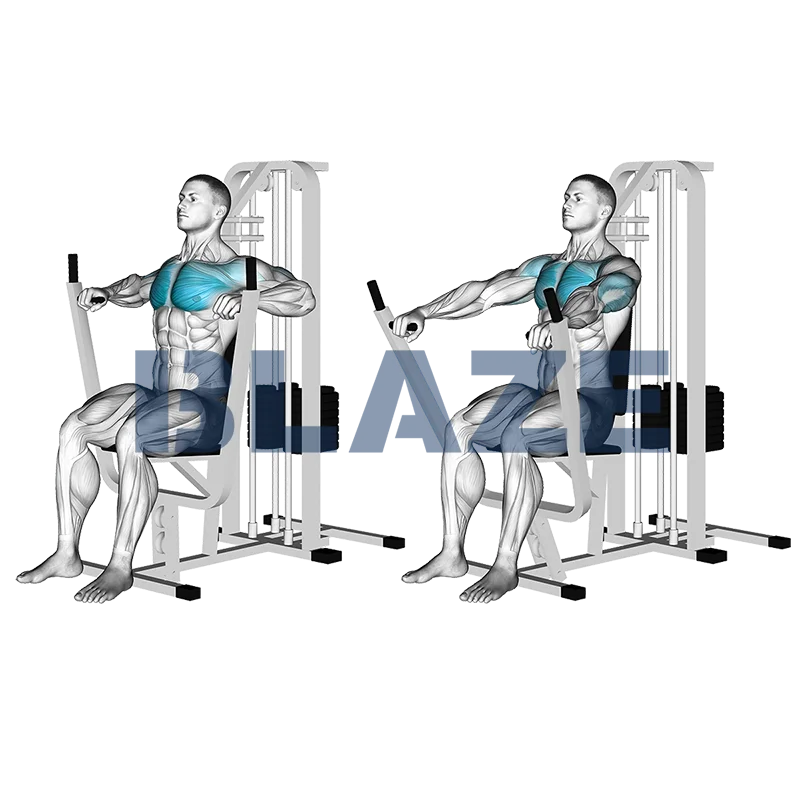
The inner chest press on machine is a focused exercise targeting the pectoralis major, particularly the inner chest, along with secondary activation of the triceps and deltoids. Key benefits include enhanced chest definition, balanced muscle growth, and improved upper body strength. For athletes, this exercise offers increased pushing power and upper body stability, which are crucial for sports requiring upper body strength and endurance. Utilizing the machine ensures controlled, safe movements, reducing the risk of injury while maximizing muscle engagement.
Community Averages
42kg
Avg. weight
92lbs
Avg. weight
* Based on data from the Blaze community
Description
- 1Adjust the seat of the chest press machine so that the handles are at your chest height.
- 2Sit down with your back pressed firmly against the backrest.
- 3Grasp the handles with an overhand grip.
- 4Plant your feet firmly on the ground to stabilize your body.
- 5Exhale as you press the handles outwards until your arms are fully extended.
- 6Inhale as you slowly bring the handles back to the starting position until you feel a slight stretch in your chest.
- 7Repeat the motion for the desired number of repetitions.
Tips & Tricks
- •Adjust the Seat Height: Make sure the seat is adjusted so that the handles of the machine align with the middle of your chest. This positioning helps target the chest muscles more effectively.
- •Proper Hand Placement: Grip the handles with your palms facing forward and thumbs wrapped around the handles. Ensure your wrists remain straight to avoid strain or injury.
- •Chest Engagement: As you press the handles forward, focus on activating your chest muscles. Avoid letting your shoulders and triceps take over the movement.
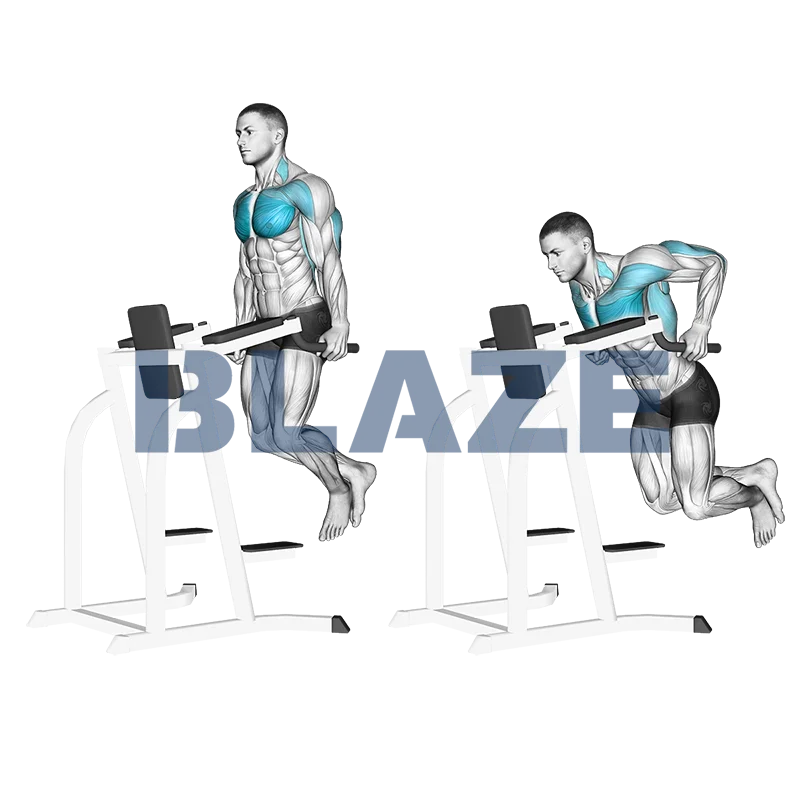
Chest dips are a powerful exercise targeted at building upper body strength. This compound movement primarily activates the pectoral muscles, triceps, and anterior deltoids. Additional muscles, such as the rhomboids, levator scapulae, and latissimus dorsi, also get engaged, enhancing overall upper body muscle coordination and balance. Athletes benefit from chest dips as they contribute to improved pushing strength, aiding in sports that require upper body power. The exercise also enhances muscle endurance and promotes better shoulder stability, crucial for performance and injury prevention.
Community Averages
9
Avg. reps/set
* Based on data from the Blaze community
Description
- 1Stand between the shoulder-width dip bars and grasp each bar firmly, straightening your arms to lift your legs off the ground. Keep your body upright.
- 2Keeping your elbows tucked in close to your body, begin to inhale and slowly lower your body until your elbows form a 90-degree angle or you feel a slight stretch in your shoulders.
- 3Exhale as you push your body back up to the starting position, maintaining control throughout the movement.
- 4Repeat the exercise for the recommended number of repetitions, ensuring you maintain proper form with each dip.
Tips & Tricks
- •Chest Forward, Elbows Wide: Lean your torso forward and allow your elbows to flare out slightly. This adjustment shifts the focus towards your chest rather than your triceps.
- •Stable Grip: Ensure a firm grip on the parallel bars to maintain stability throughout the movement. Use your hands to drive the movement, but avoid squeezing too hard, as this can cause undue strain.
- •Control Your Descent: Lower yourself in a controlled manner to maximize muscle engagement. The descent should be slow and deliberate to avoid any injury and to ensure proper muscle activation.
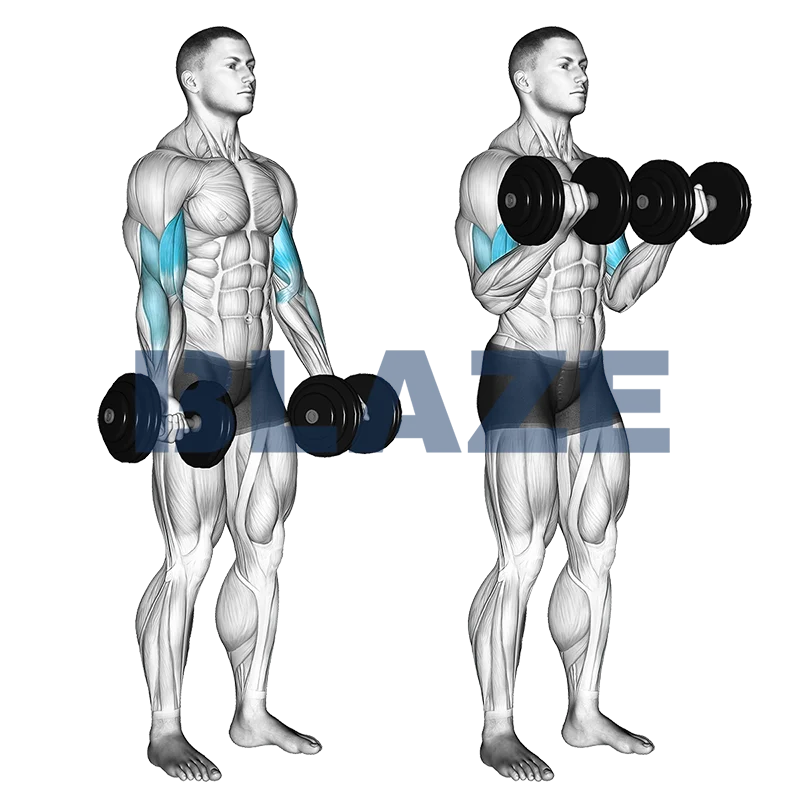
The biceps curl with dumbbell is a fundamental strength training exercise that targets the biceps brachii, primarily activating the biceps while also engaging the brachialis and brachioradialis. This exercise significantly improves muscle strength and size in the upper arms, making it a staple for athletes seeking enhanced arm definition and performance. Additionally, it helps improve grip strength and forearm stability, which are crucial for athletes in sports requiring strong lifting and pulling motions. This exercise is versatile, effective, and promotes overall upper-arm muscularity and function.
Community Averages
20kg
Avg. weight
44lbs
Avg. weight
* Based on data from the Blaze community
Description
- 1Start Position: Stand with a dumbbell in each hand, using a supinated grip (palms facing forward), and let them hang by your sides.
- 2Curl Dumbbells: Exhale and simultaneously curl both dumbbells up towards your shoulders. Your palms should rotate to face your shoulders at the top.
- 3Adjust Elbows: Once your elbows are fully flexed, move them slightly forward so your forearms are vertical.
- 4Hold Position: Hold the position for a count of two.
- 5Lower Dumbbells: Inhale and slowly lower the dumbbells back to the starting position.
- 6Repeat: Perform the movement for the prescribed number of repetitions.
Tips & Tricks
- •Use a Moderate Weight: Start with a weight that allows you to maintain proper form, but still challenges your muscles by the last few reps.
- •Keep Your Elbows Stationary: Ensure your elbows stay close to your torso and do not move forward or backward during the curl. This isolates the biceps effectively.
- •Engage Your Core: Keep your core tight and your back straight to prevent swaying and to maintain stability.
Day 4: Extreme Split - Lower Body Part 2
5 exercisesThe barbell deadlift is a powerful full-body exercise that offers numerous benefits for athletes. It primarily targets the glutes, hamstrings, lower back, traps, and core. The exercise promotes muscle growth, enhances strength, and improves posture. Additionally, it aids in developing grip strength and increasing power output, vital for athletic performance. By engaging multiple muscle groups, the deadlift supports functional movement patterns, making it an essential exercise for athletes looking to enhance overall strength and conditioning.
Community Averages
64kg
Avg. weight
142lbs
Avg. weight
* Based on data from the Blaze community
Description
- 1Setup: Stand with your feet hip-width apart under the barbell. The bar should be positioned halfway over your feet when you look down.
- 2Grip: Bend down and grasp the barbell with a shoulder-width grip.
- 3Prepare: Take a deep breath, ensuring your torso is upright and your back and arms are straight.
- 4Lift: Stand up by driving with your legs, pulling the bar up the front of your legs.
- 5Top Position: At the top of the lift, squeeze your glutes, pull your shoulders back, and exhale.
- 6Lower:*Push your butt backward and lower the bar down the front of your legs, keeping your back straight.
- 7Finish: Once the bar passes your knees, bend your knees and place the bar back on the floor. Repeat as needed.
Tips & Tricks
- •Engage Your Core: Always keep your core muscles tight to support your spine and maintain good form throughout the lift.
- •Proper Foot Placement: Position your feet hip-width apart with your toes slightly pointing outwards. Make sure the barbell is over the middle of your feet.
- •Grip Tightness: Use a strong overhand grip. If the weight is heavy, consider using a mixed grip (one hand overhand, one hand underhand) or using lifting straps.

The barbell hip thrust is a powerful lower-body exercise that primarily targets the glutes, with secondary activation of the hamstrings, quads, and core. This exercise enhances hip extension strength, boosts athletic performance by improving sprinting and jumping capabilities, and aids in overall hip mobility. Benefits include increased glute size and strength, improved posture, and reduced risk of injury through better stabilization. Athletes profit from superior lower-body power, enhanced agility, and greater force production for a competitive edge.
Community Averages
79kg
Avg. weight
173lbs
Avg. weight
* Based on data from the Blaze community
Description
- 1Position a bench parallel to a loaded barbell.
- 2Sit with your back against the bench, legs extended and feet under the barbell.
- 3Grasp the barbell firmly with both hands.Bend your knees and place your feet flat on the floor, hip-width apart.
- 4Exhale as you raise the barbell by extending your hips until they are fully extended.
- 5Squeeze your glutes and hold for a count of two.
- 6Inhale as you lower the barbell by flexing your hips, keeping it above the floor.
- 7Repeat the exercise, focusing on maintaining proper form and control.
Tips & Tricks
- •Proper Foot Placement: Ensure your feet are planted firmly on the ground directly under your knees. This helps in achieving optimal glute activation and maintaining balance throughout the exercise.
- •Controlled Movement: Focus on controlled movements. Avoid using momentum to lift the barbell. This ensures that your glutes are doing the majority of the work, maximizing their development.
- •Engage Your Core: Keep your core tight and engaged throughout the exercise. This not only supports your spine but also ensures a more effective thrust.

The dumbbell split squat is a powerful unilateral exercise that targets the quads, glutes, and hamstrings. This move also engages the core, enhancing stability and balance. Athletes benefit from improved lower body strength, symmetry, and injury prevention. The unilateral nature of the split squat helps correct muscle imbalances and enhances coordination. By incorporating this exercise into their routine, athletes can enhance their performance in sports requiring leg strength, agility, and power.
Community Averages
25kg
Avg. weight
56lbs
Avg. weight
* Based on data from the Blaze community
Description
- 1Hold a dumbbell in each hand and stand upright with the dumbbells hanging by your sides.
- 2Inhale as you take a large step forward with one leg and bend the knee of that leg until there is a 90 degree angle between your thigh and your calf. The knee of your other (back) leg should almost touch the floor.
- 3Exhale as you drive back up with your front leg and step back into the standing position.
- 4You have completed your first repetition.
- 5Repeat the same motion with your opposite leg. Keep alternating the leg with each lunge.
Tips & Tricks
- •Maintain Proper Posture: Keep your upper body straight, with shoulders back and relaxed, and chin up. Picking a point to focus on in front of you can help you maintain balance.
- •Engage Your Core: Engage your core muscles throughout the movement to maintain stability and support your lower back.
- •Focus on Form, Not Speed: Perform the exercise slowly and with control rather than rushing through it. This ensures proper muscle engagement and reduces the risk of injury.
The machine leg extension is a strength training exercise targeting the quadriceps, primarily engaging the rectus femoris, vastus lateralis, vastus medialis, and vastus intermedius. This exercise isolates the quads, allowing for focused muscle development, improved knee extension strength, and enhanced overall leg definition. Athletes benefit from increased power and stability in activities requiring leg strength, such as running, jumping, and cycling. Additionally, strong quadriceps support knee joint health, reducing injury risk and improving athletic performance.
Community Averages
51kg
Avg. weight
112lbs
Avg. weight
* Based on data from the Blaze community
Description
- 1Sit on the leg extension machine. Adjust the weight. The backs of your thighs should fully rest on the seat and your back should be fully supported by the back rest.
- 2Lock your feet under the foot pads of the lever with the pads resting slightly above your ankles. Grasp the side handles for support.
- 3Exhale as you lift the foot pad forward and upward until your legs are fully extended.
- 4Hold there for one second and then inhale as you return to the starting position.You have completed your first repetition. Repeat the motion in a controlled way and count your reps.
Tips & Tricks
- •Make sure the machine is properly adjusted to fit your body. The axis of rotation of the machine should align with your knee joint to avoid unnecessary strain.
- •Keep your back firmly against the seat and avoid arching it.
- •Grip the handles to stabilize your upper body and prevent leveraging off the machine.

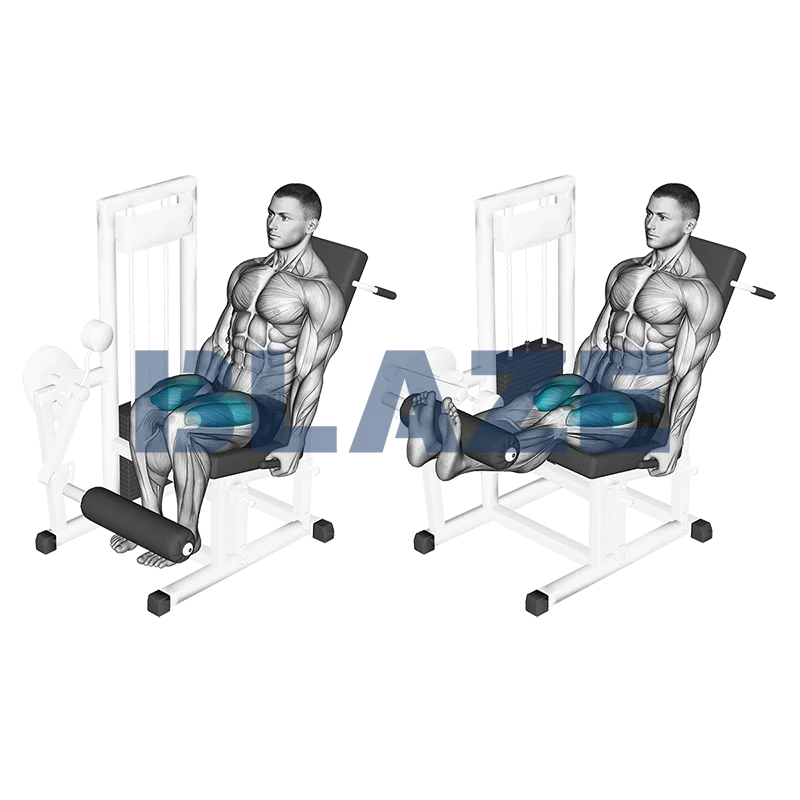
The machine seated leg curl is a highly effective exercise focusing primarily on the hamstrings, with secondary activation of the calf muscles. This exercise is pivotal for athletes as it enhances lower body strength, contributes to muscle balance, and reduces the risk of injury. Efficiently targeting the hamstrings, it aids in improved sprinting speed, jumping ability, and overall leg endurance. The machine's controlled motion ensures proper form, making it suitable for both beginners and advanced athletes aiming to optimize their performance and athletic capabilities.
Community Averages
43kg
Avg. weight
94lbs
Avg. weight
* Based on data from the Blaze community
Description
- 1Adjust the Machine: Ensure the machine’s pads are set up so they sit comfortably against your lower back when seated.
- 2Position Your Legs: Place your legs on the padded lever so it rests just below your calf muscles.
- 3Secure the Lap Pad: Adjust the lap pad so it sits securely on your thighs, just above the knees.
- 4Lift and Grip: Straighten your legs out in front of you and grasp the side handles of the machine.
- 5Execute the Movement: Pull the padded lever down and back towards you using your legs as far as you can.
- 6Hold and Return: Hold the position for a second, then slowly return the lever back to the starting position.
- 7Repeat the movement in a controlled manner for your desired number of repetitions.
Tips & Tricks
- •Ensure the pad is adjusted to rest comfortably against the back of your lower legs just above the ankles. This helps in maximizing the range of motion.
- •Breathe out as you curl the weight towards you and breathe in as you slowly return to the starting position. Controlled breathing can enhance your focus and performance.
- •Perform each repetition through a full range of motion to effectively target your hamstrings. Avoid partial reps to prevent muscle imbalances.
Start this workout in the Blaze app
Download Blaze Workout Tracker and follow this plan with guided sets and tracking.